American Flag Shortbread Recipe

When the settlers came over from Europe, they didn't just bring a will for freedom and revolution: they brought over their shortbread recipes. 

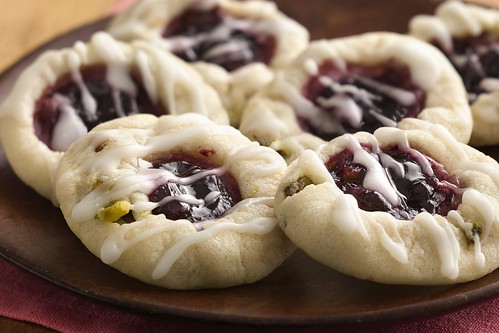
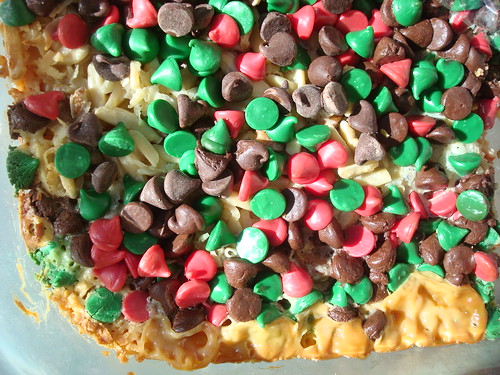
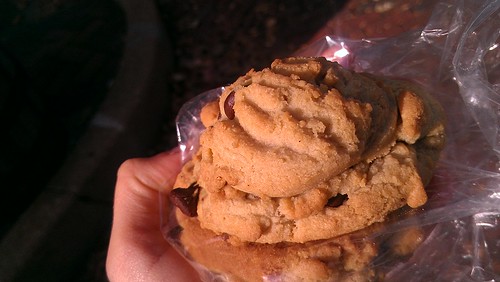
Shortbread is perhaps one of the world's most perfect, and most simple, foods. Consisting primarily of flour, butter, sugar, and salt, it can be prettied up in any number of ways, but is in its essence a humble food. 

American Flag shortbread

This recipe takes but one liberty: the addition of cornstarch to mimic the lower-protein flours which might have been used in old-school Europe; but otherwise it is fairly straightforward.

American Flag shortbread

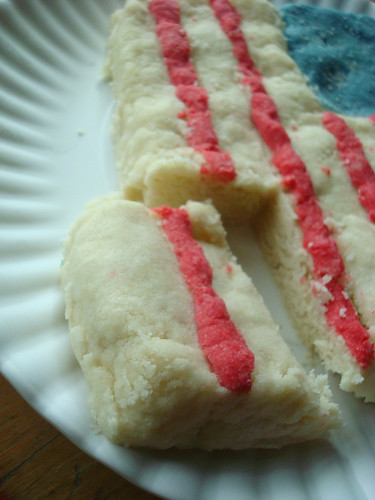
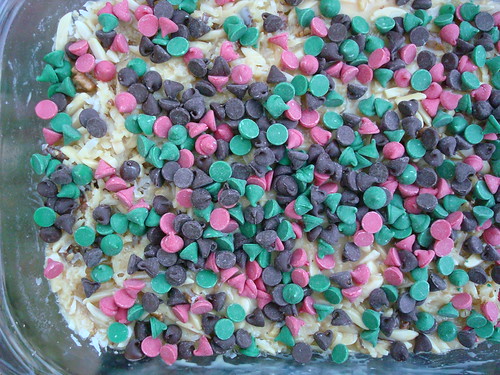
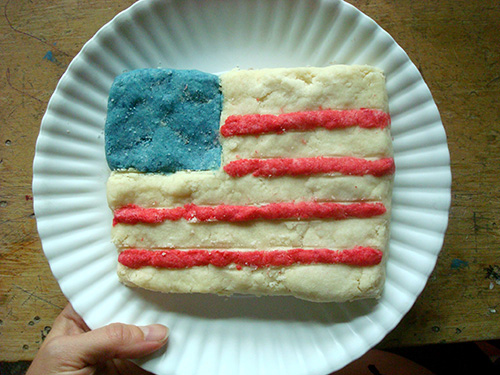
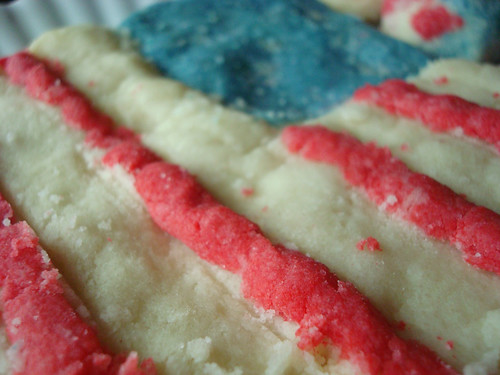
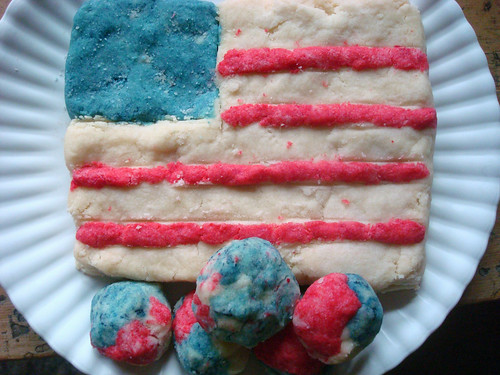
To make it a bit more festive, I reserved about 1/8 of the dough, which tinted red. I then made the majority of the dough into a rectangle, removing a portion from the left hand corner to make the blue portion of the flag. I tinted it after I cut it out; this was how I ensured I had enough dough.

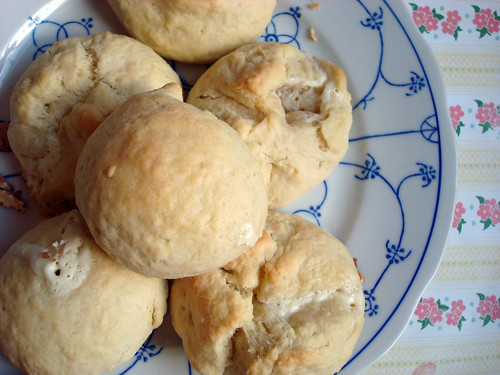
Now, I should tell you that decorating with tinted shortbread is tough because you can't really roll or shape it. So I gathered crumbles and kind of pressed them into stripes, and simply shaped and placed the blue portion where I had removed it initially. I used the leftover bits to form ugly multicolored balls of shortbread. They still tasted good. 

American Flag shortbread

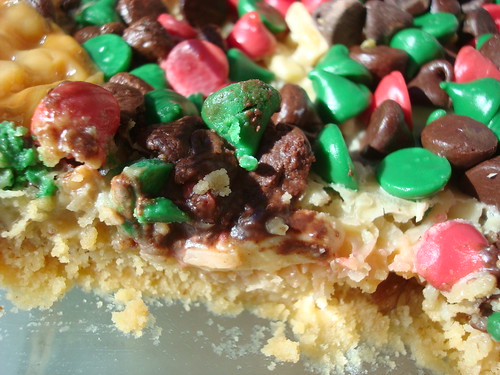
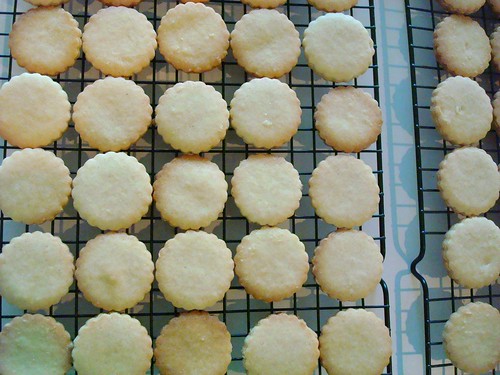
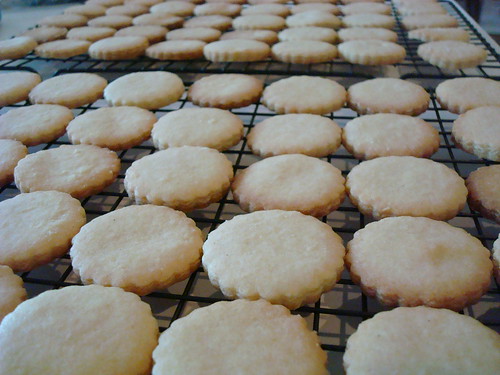
It baked up pretty sweet, don't you think? Here's the recipe for shortbread--it's a keeper. 

How to make perfect shortbread

as seen on Craftsy

Ingredients:

  • 1 ¼ cups all-purpose flour (about 6 ounces)
  • 1 stick unsalted butter, softened (4 ounces)
  • ½ cup granulated sugar (about 2 ounces)
  • ¼ cup cornstarch (about 1 ounce)
  • Preheat the oven to 325 degrees F.

Procedure

  1. Cut the butter into pieces. Using a wooden spoon, mix the butter and sugar by hand until pale and creamy.
  2. Sift the flour, cornstarch and salt into the bowl of creamed butter and sugar, and mix well, continuing to use your wooden spoon. It will begin to come together in a somewhat crumbly dough, but it should very easily clump together if you gather it with your hand. If baking as a large round or as small cutout cookies, transfer to a parchment-lined baking sheet.
  3. Lightly flour a work surface. Place the dough on top. Roll out the dough until it is about ¼-inch thick.
  4. Decide what shape you’d like the shortbread in (follow the steps above, to flag-ify it). If you’d like it to be a round, shape it into a circle by hand. If you’d like it to bake in a pan, press it into a greased 8″ by 8″ pan. Or, simply cut the rolled dough using a lightly floured cutter. Score the dough if it will be sliced after baking, and lightly prick all over with the tines of a fork.
  5. Bake in the preheated oven for 25 minutes, or until the sides and bottoms are lightly browned but the top is just set. Step 7: Let cool on the pan for about 5 minutes before transferring to a wire rack to cool completely. Don’t get greedy, or you might burn your mouth.

Happy 4th of July! Don't forget to make some pop rocks cookies, too.

Millionaire's Shortbread Cookie Cups Filled with Milk

Milk filled cookie shooters

Cronuts. Brookies. Donnolis. S'moreos. The world of mash-up desserts, or the "hybrid trend", as it has been called by food consultants and PR peeps, has pretty much gotten out of control. But as annoyed as you may want to be with the trend, the fact is...if some is good, more has the potential to be amazing. And so we continue to--excuse the pun--eat it all up.

A recent dessert hybrid dreamed up by cronut creator Dominique Ansel was the chocolate chip cookie "milk shot"--a cup made of chocolate chip cookie, enforced so that it could hold milk long enough to take it as a "shot" and then eat the vessel from whence it came.

It never hit as big as the cronut, but I still think it's a pretty nifty idea, because how many desserts can actually allow you to utter the words "I'm gonna get milk and cookie CRUNK right now!"...? Seriously. No other dessert I can think of.

And an easy-to-make version hit my radar recently with an email from Pillsbury featuring several of their easy mash-ups (cannoli doughnuts, crescent bagels, etc). Their version included chocolate chip cookie dough baked in cupcake tins, then lined with chocolate, then filled with milk. Here's their version:


Milk Filled Chocolate Chip Cookie Cup

Looks yum, right?

But of course, I didn't want to do EXACTLY what they told me to, so I thought "why don't I do a Millionaire's shortbread spin?".

It was quite easy to do: I used sugar cookie dough instead of chocolate chip, then added a layer of caramel (since I think I'm pretty cool sometimes, I made my own) atop which I added a layer of chocolate. These fat cookie confections held the milk perfectly, and after a minute or two it begins to soak in to the rest of the cookie and soften the caramel. Milk filled cookie shooters You can either drink the milk then eat the cookie, or break it apart and then let the pieces "soak" in the spilled milk for a while longer.

Milk filled cookie shooters

No matter how you decide to eat it, the unrefutable truth is that these things are delicious. I mean, sugar cookie dough, caramel, chocolate, a touch of salt, and milk too? There is no part of this equation that is wrong or bad. The taste is classic, but the method of presentation and the mode of eating is fun. And isn't that what dessert is about, joy and fun?

Here's the recipe. 

Millionaire's Shortbread Cookie Cups Filled with Milk (printable version here)

You need: a cupcake tin (jumbo or regular, but not mini), parchment paper, spoons and spatulas

Ingredients

  • 1 box Pillsbury sugar cookie dough (or one batch of your favorite type), dough prepared per the package instructions but not baked
  • 1 bag chocolate morsels (12 ounces)
  • 1 cup sugar
  • Milk

Procedure

  1. Preheat the oven to 375. Generously grease the cupcake tin, sprinkle each cup with confectioners' sugar, and place a sheet of parchment along the bottom (for easy removal later). Why not just use cupcake cups? I didn't want the ridges on the sides. You can use the cups if you don't mind the ridges, though. No judgment. 
  2. Milk filled cookie shooters
  3. Grab big fistfulls of dough and press them into each of the cupcake cups. Milk filled cookie shooters Press a dent in the center. You want the cups to be about half full of dough. My entire batch was sufficient to fill a 6 cup "texas sized" cupcake pan. This is to say, these cups were no mere shot glasses. They were fatties. 
  4. Milk filled cookie shooters
  5. Now, bake the cookie cups. Since mine were so thick, they baked for about 25 minutes--longer than the time you'd bake the dough if you were making mere cookies. My advice? Keep an eye on their progress around the suggested cookie bake time, but then keep them in the oven until they are puffy and golden.
  6. Milk filled cookie shooters
  7. Once puffy and golden, remove from the oven. They will start to deflate in a matter of minutes. This is actually a good thing for you. 
  8. Milk filled cookie shooters
  9. After 5 minutes or so, approach with a spoon and knife. Milk filled cookie shootersFirst, use the knife to loosen the edges of each cookie cup to ensure easy removal later. But keep them in the cupcake tin. Now, use the spoon (or go ahead and use your impeccably clean hands) and press the cookies into a more pronounced cup shape. 
  10. Milk filled cookie shooters
  11. Let the cookies cool for about 30 minutes in the cups.
  12. Now, make your caramel. Simply put the sugar in a dry saucepan, and put it over medium-high heat. Caramelize it per the instructions in this tutorial. Once liquid, pour a little into each cookie cup and spread using a spoon to ensure even coverage inside of the cup. Milk filled cookie shooters Let the caramel set for about 30 minutes before proceeding.
  13. Now, melt the chocolate in the top of a double boiler. Once melted, pour some on top of the caramel layer in each cup and spread so it covers the inner cup evenly. Don't make it too thick or you won't have anywhere to put your milk.
  14. Milk filled cookie shooters
  15. Let the cookie cups set again, this time for 2 hours or so, until the chocolate has become firm. 
  16. Milk filled cookie shooters
  17. Once the chocolate is firm, you're ready to serve! Remove the cups from the cupcake tin. Place each serving in a shallow bowl (just nicer in case the milk seeps out). Fill each cup with milk--pour it right in. And serve!
  18. Milk filled cookie shooters
  19. It's nicest to let the milk sit for a minute or two before drinking and devouring--this will soften the caramel and chocolate and make it, in my opinion, a more enjoyable experience. Milk filled cookie shootersBut you follow your bliss. 

Enjoy!

Best Health Food Ever: Millet Cookies

Millet cookies

I realize that I have something of a reputation for riding unicorns, wearing sparkles, and subsisting on a diet of mainly pink frosted treats. But the fact is this: I love a good hippie cookie every now and again. Whether it's the "Shazaam!" from my home base in New Jersey or a Power Cookie from Whole Foods, I enjoy these cookies with dessert-worthy delight. Something about the nuts, hearty hippie ingredients like nut or whole wheat flour, and a plethora of trail mix-esque mix ins just does it for me. 

So the other day when I found a bunch of millet in my cabinet, I decided to see if I could make it into a tasty cookie creation. I'll tell you right now, so you don't stress about it, that the cookies tasted delicious.

Millet cookies

I found a recipe for oatmeal millet cookies on Grateful Table, which I proceeded to so completely change that I wouldn't even feel comfortable saying I adapted it...more like used it as a springboard. Still, I do want to give the website a shout-out because these cookies also look highly delicious.

While I toasted some cashews and millet, I evaluated my ingredients. I realized I wanted to soften the butter which was totally cold, so I did something so forbidden: once the millet and nuts came out of the oven, I laid the cold butter on top of the millet. I turned the side every minute or so. Believe it or not, because it really seems like it shouldn't have worked, it did. 

Millet cookies

But I digress. Back to the cookies.

Toasty millet gives a fantastic crunch to the cookies, as well as a pleasingly nutty flavor that works in harmony with the flavor of the actual nuts and wheat flour. Perhaps because of all of the other ingredients, the wheat flour isn't as assertive tasting as it is in some recipes, and they maintain the identity of a cookie which happens to have healthy ingredients, rather than tasting like health food. 

Of course, the chocolate morsels don't hurt. Don't even think about skipping them. 

Millet cookies

Nice and crispy on the outside, hearty and full flavored and slightly chewy on the inside. They may not be actual health food, but these cookies are awfully good.

Millet cookies

Millet cookies (not actually health food) - Printable version here

Makes about 30 cookies

Ingredients

  • 1 cup millet
  • 1 cup cashews, coarsely chopped
  • 1 1/2 cups whole wheat flour
  • 1/2 teaspoon baking soda
  • 1 teaspoon salt
  • 2 sticks unsalted butter, softened
  • 1 cup light brown sugar, packed
  • 2 large eggs
  • 1 teaspoon vanilla
  • 1 cup chocolate morsels

Procedure

  1. First, preheat the oven to 350. Line two baking sheets with parchment paper.
  2. Now, toast the nuts and millet on a baking sheet while the oven preheats. Because they toast at different rates, what I did was scatter the cashews on half of the tray and let them toast for about 5 minutes, then I took the sheet out, added the millet to the other side, then let the whole tray toast for five more minutes
  3. Millet cookies
  4. Remove the tray from the oven and put it somewhere so it can cool, so not on top of the oven (you don't want your mix-ins to be hot). Proceed with the rest of the steps as they cool.
  5. In a medium bowl, sift together the flour, baking soda, and salt. Set to the side.
  6. Cream the butter in a stand mixer until nice and fluffy, 3 to 5 minutes. Add the brown sugar and continue to mix until it becomes fluffy again, 3 to 5 more minutes. 
  7. Stop the mixer. Add the eggs one at a time, briefly mixing after each addition until incorporated. Stir in the vanilla. 
  8. Add the dry ingredients to the butter mixture, mixing as minimally as possible until everything is incorporated into a chocolate chip cookie-esque dough. 
  9. Now, add the toasted millet and cashews and the chocolate morsels. Fold gently into the dough until evenly incorporated. 
  10. Millet cookies
  11. Place the cookie dough with an inch or two of space around on all sides on the cookie sheet. Millet cookiesI made pretty fat cookies, a heaping tablespoon, but you make them however big you want them. 
  12. Bake for 12 to 15 minutes, or until toasty on the edges and set in the center. Remove from the oven. Let cool on the baking sheet for a minute or so before transferring to wire racks to cool completely. 

Millet cookies

Enjoy!

Tubular: Easy Mint Chocolate Chip Cookies Using Refrigerated Sugar Cookie Dough

Cookie tree

Somehow, it's happened: you find yourself in need of a batch of homemade cookies, STAT. It might be for the cookie swap you thought was tomorrow, not today, or the school party you totally forgot, or maybe you just want to whip up something sweet in record time.

Green cookies

As these cookies prove, a time crunch need not mean that you sacrifice all the fun of baking--they are actually made from "doctored" refrigerated sugar cookie dough. They're assembled in less than five minutes and baked in about 10 minutes--even with cooling time, the process of going from mere ingredients to "let's party" all happens in about 30 minutes. 

ALL YOU NEED:

Green cookies

All you have to do? Mix that dough with mint and chocolate chips (they're easily found in the baking aisle this time of year), a teaspoon of peppermint extract and maybe a few drops of green food coloring. Roll into balls and bake as specified on the package. They bake up like a minty, buttery, sweet Christmas miracle!

Mint Chocolate Chip Cookies Using Refrigerated Sugar Cookie Dough

Makes about 24

  • 1 tube refrigerated sugar cookie dough
  • 1 teaspoon peppermint extract
  • 1 cup mint and chocolate chips, mixed together
  • 4-5 drops green food coloring

Preheat the oven to 350 degrees F. Line two baking sheets with parchment paper.

In a large bowl, break up the refrigerated cookie dough by hand. Add the food coloring and peppermint extract. Combine well.

Make them green

Add the morsels, mixing by hand to knead them evenly but gently throughout the dough.

Green cookies

Divide the dough into 24 equal parts. (First divide in two, then those two pieces into two to make four, then break each of those parts into three pieces, then divide those in two. You'll have 24. Don't get confused.)

Roll each piece into a ball and place on the baking sheet, well spaced. Green cookies

Bake for 8-11 minutes, or until soft in the center but lightly browned on the edges. I don't know how to say it other than this, but the middles might not look 100 percent set. They will bake a touch more when you remove the cookies, though, so it's ok.

Green cookies

Note: At this point, instead of baking, you can freeze the dough balls on the sheets if you prefer not to bake right now (if you want to do it in the morning, say). Just don't forget to turn off the oven and remember to preheat it again before you bake. 

Let the cookies cool on the sheets for 6 minutes before transferring to a wire rack to cool completely. Use a spatula for the transfer; if the cookies seem too soft, wait another minute or two before transferring.

The Bake-Off is Coming: Lemon Pistachio Blackberry Thumbprints Recipe

Lemon cookies

CakeSpy Note: OMG! The 46th Annual Pillsbury Bake-Off is coming! Since I so deeply loved attending the 45th Bake-Off, I thought I would get you excited early by sharing some of the finalists' recipes. Narrowed down from zillions of entries, I'll profile some of the 100 finalists--but of course, based on the subject matter of this site, I will focus on sweets! You can follow them by clicking the bakeoff tag below the post to see which ones have been posted so far. Enjoy! 

I appreciate the power of a promise. And these cookies, designed by Joan Cossette of Colbert, WA offer a delectable one: "Each bite of these sugar cookies promises a bit of sweet jam and a drizzle of sweet icing." Oh, yum.

Lemon Pistachio Blackberry Thumbprints

Prep Time: 25 Min Total Time: 35 Min Makes: 36 servings

Ingredients

  • 1 roll Pillsbury refrigerated sugar cookie dough
  • 1/2 cup shelled salted roasted pistachios, chopped
  • 1/3 cup All Purpose Flour
  • 1 teaspoon grated lemon peel
  • 1/2 cup Blackberry Jam
  • 1 cup powdered sugar
  • 1 tablespoon honey

Procedure

  1. Heat oven to 325°F. Line large cookie sheets with parchment paper. Let cookie dough stand at room temperature 10 minutes to soften.
  2. In large bowl, break up cookie dough. Add pistachios, flour and lemon peel. Mix with wooden spoon or knead with hands until well blended.
  3. Shape dough into 1-inch balls.
  4. Place 2 inches apart on cookie sheets. With thumb or handle of wooden spoon, make indentation 3/4 inch wide in center of each cookie. Spoon about 1/2 teaspoon jam into each indentation.
  5. Bake 10 to 13 minutes or until set but not browned. Remove to cooling racks. Cool 3 minutes.
  6. In small bowl, mix powdered sugar, honey and 1 tablespoon water until smooth. If necessary, stir in water, 1 teaspoon at a time, until of drizzling consistency. Drizzle honey glaze over warm cookies. Store in covered container.

Chocolate Cookies With Real Pieces of Cookie Monster

Cookie monster cookies

As Aunts go, I am probably the worst and most evil one in the world. I realize that you probably think I am joking, but allow me to illustrate this statement with an example.

So. My young nephew, Dylan (code names: Dilly, Dil, Dillybar), age three, just loves a flavor of ice cream from Hoffman's Ice Cream called Cookie Monster. It's a blue ice cream with all sorts of cookies mashed into it. The last time I took him for ice cream, I asked if he knew why it was blue. He indicated that he did not in fact know, so I revealed "that's because it's made with real pieces of the Cookie Monster!".

Now, I'll tell you what happened then. Dylan stopped eating ice cream, and his lower lip kind of started trembling. I'll tell you the truth--he was closer to crying than not.

"Oh my god! I mean, gosh!" I said. " Aunt Jessie was just kidding. It's blue because it's cookie monster's favorite flavor!".

Thankfully, this weak save was sufficient and the happy ice cream twinkle came back into his eye and he continued eating. I did notice, however, that the next time we went to Hoffman's he ordered Mint Chocolate Chip. 

Now, don't tell my sister (Dylan's mother) because I'm sure that she will agree that this is proof that I am the absolute worst Aunt ever, not only because I scared her son but because I took him out for ice cream at a non-approved snack time. 

Chocolate Cookies

But since I apparently cannot learn my lesson, I made these chocolate cookies recently and couldn't resist adding some blue candy melts. You know, to give the look of real pieces of cookie monster melted into the batter. I'm dedicating them to young Dylan, and can't wait to tell him that they're made with real pieces of cookie monster.

Joking aside, these cookies are fantastic. They are surprisingly light in texture for their extreme chocolate to other ingredients ratio, but very flavorful. I added a dash of dark coffee to the mix to heighten the chocolate flavor, I trick I learned from the BAKED brownie recipe. It worked well.

This is a great cookie to have in your jar. And they taste great without the candy melts, too.

Chocolate Cookies

Chocolate Cookies With Optional Real Pieces of Cookie Monster

Makes about 24 - printable version here

  • 1 2/3 cups (10-oz. pkg.) Dark Chocolate Morsels
  • 1 cup all-purpose flour
  • 1/4 cup unsweetened cocoa
  • 1 teaspoon baking soda
  • 1/2 teaspoon salt
  • 1/2 cup (1 stick) butter, softened
  • 1/2 cup packed light brown sugar
  • 1/4 cup granulated sugar
  • 1 large egg
  • 1/2 teaspoon vanilla extract
  • 1/2 teaspoon strong brewed coffee (optional)
  • 1 healthy handful light blue candy melts

Procedure

  1. Preheat oven to 325° F. Line baking sheets with parchment paper.
  2. Melt the morsels in in a saucepan or in the microwave. If on the stovetop, stir frequently to prevent scorching. Set aside.
  3. Sift the flour, cocoa, baking soda and salt into a medium bowl.
  4. Cream the  butter, brown sugar and granulated sugar until smooth and light, 3 to 5 minutes.
  5. Add melted chocolate and mix well. Add egg and vanilla extract, mixing until well blended, about 1 minute. Add flour mixture, mixing just until blended. If you want, press a couple of blue candy melts into the cookies.
  6. Chocolate Cookies
  7. Shape into balls and place them on to your prepared baking sheets.
  8. Bake for 16 to 18 minutes or until wooden pick inserted in center comes out with moist crumbs and the tops have a cracked appearance.
  9. Chocolate Cookies
  10. Cool on baking sheets for 5 minutes before transferring to a wire rack to cool completely.


Sweet Discovery: The Shazaam Cookie, Nature's Corner, Spring Lake NJ

I'm going to tell you the truth, here. Had I read the sign carefully, I might not have went for this cookie. After all, it is advertised as being "high fiber" and boasts its content of rice protein powder to satisfy appetite. Those selling points make the cookie sound suspiciously like health food.

It does make sense, of course--they are sold at a health food store in New Jersey. They're called the "Shazaam Cookie" and they're baked on site at Spring Lake Heights' Nature's Corner store (where health nuts and stoners from my neck of the woods have bought their hippie food since I was in high school). They're chock-full of whole grains, organic hemp seeds, organic rice protein powder, and organic coconut oil. As I learned on their website, the cookies "also have flavorless vegetable fiber to help regulate your digestive system. Yummy chocolate chips add just the right amount of sweetness."

Perhaps they sense that they might lose some people with this description, so they finish "Of course,  These cookies are fantastically popular, and we love making them fresh in store daily. Stop in today and give them a try!"

Now. I am going to tell you that even if health food scares you, you really must give this cookie a try. Because somehow, the little elves at Nature's Corner manage to make a healthy treat that is a seriously delectable sweet. It is soft and lightly crumbly--not like it will crumble apart, but like it will yield in your mouth. But then little pop-crunches from the hemp seeds. Nice texture. And then you get the chocolate chips, little bursts of deep chocolate flavor surrounded by a nutty, grain-y flavor that is a wonderful complement. They sort of remind me of the Urban Legend cookies from my new book, but like, their healthier cousin.

I found this cookie a wonderul surprise, and was so delighted to learn that they are baked on site. I can most certainly see how they've begun to garner a cult following, and they can certainly count me as one of their fans from now until forever. 

Nature's Corner,  2407 Route 71, Spring Lake Heights, NJ; online here. 

Sweet Treats: Semolina Sesame Cookies

Have I ever told you that one of my favorite bakeries, not only in Seattle, but in the world, is Macrina Bakery? From their biscuits to their morning rolls to their cookies, I can't get enough of their sweet treats. Every month they share a recipe via their newsletter, and I in turn enjoy to share with you. 

This month it's Semolina Sesame Cookies. As the headnote says, "These cookies are inspired by acclaimed baker Carol Field, who gathered a collection of wonderful regional recipes from bakers, grandmothers, and chefs on her travels through Italy. The essence of this recipe came from one of her books (I have them all!), and is so typically Italian. The semolina, a coarsely ground wheat flour used widely for making pasta, lends a beautiful crisp texture, and the sesame seeds make them a classic accompaniment to a sweetened shot of espresso. Buttery annd not too sweet, they'll totally satisfy the 4 p.m. nosh need!"

Makes 18 3-inch cookies

  • 3/4 cup plus 2 tablespoons unbleached all-purpose flour
  • 1/3 cup plus 1 tablespoon semolina flour
  • 1/4 teaspoon kosher salt
  • 7 tablespoons unsalted butter, at room temperature
  • 1/3 cup plus 1 tablespoon sugar
  • 1 large egg
  • 1/4 cup sesame seeds

Procedure

  1. Position 2 racks in the center of the oven and preheat to 325°F. Line 2 rimmed baking sheets with parchment paper. Set aside.
  2. Sift together the flours and salt in a medium bowl.
  3. In the bowl of a stand mixer fitted with the paddle attachment or in a large bowl using an electric mixer, cream the butter and sugar. Start on low speed and increase to medium for a total of 5 to 8 minutes, stopping to scrape down the bowl with a rubber spatula as needed. The mixture will be light, fluffy, and pale. Add the egg and mix on low speed until fully incorporated, then scrape the bowl down again. Gradually add the dry ingredients mixing until they're just incorporated and the dough is smooth, about 1 minute. Be careful not to overmix: the cookies may become tough.
  4. Turn the dough out onto a lightly floured work surface. Divide it into 4 equal pieces, then roll each piece into a 1/2-inch-wide rope. Use a ruler to measure and then cut the rope into 5-inch segments. Each segment will become a cookie. If the dough is too soft, chill for 10 minutes to make it easier to handle.
  5. Lay each rope in an S shape, 1 inch apart, on the prepared baking sheets. Tuck the ends under and compress slightly. Chill the sheets in the freezer for 20 minutes to help the cookies hold their shape while baking. (You may also freeze the cookies at this point, covered tightly, for up to 1 week. Let them thaw for about 20 minutes before baking.)
  6. Brush each cookie with a little bit of water and top with the sesame seeds. Bake for 18-20 minutes, or until the cookies are light golden brown. Cool on the sheet for 5 minutes, then transfer to a wire rack to cool completely. Stored in an airtight container at room temperature, these cookies keep their great flavor for at least 1 week. 

Thumbs Up: CakeSpy Samples Thumbs Cookies

Thumbs Cookies

Say hello to Thumbs Cookies. They're a tiny cookie that makes you feel fine about eating a baker's dozen of them because they are so small. They're tasty and crumbly and have a very nice sugar-crunch from their topping. After having received a delicious sample package including the original thumbs, chocolate thumbs (with a little dollop of Mast Brothers chocolate in the middle) and some if the little sandwiches with hazelnut choco filling, I can say: I approve of these cookies. But I also enjoy the fact that they come with an interesting story. I'll let Robyn, the baker behind the lilliputian treats, explain it, alongside my clever photos, OK?

Tom Thumb. Get it?

Here goes. (From Robyn): So, I launched Thumbs Cookies, Inc. about a year-and-a-half ago after I had baked someThumbs Cookies for a friend of mine who works at The Ace and she said, "how do we buy these?" 
But...let me back up.
 
As a little girl in Minnesota I grew up baking Thumbs with my mom, Barb. The smell of these tiny cookies would wake me up very early in the morning and I would see my mom rolling a tiny ball of dough and then placing it on the cookie sheet and finishing each one with athumb print. I was mezmorised.. Each one was so perfect. I asked if I could make them, too, and certainly she agreed. Mine however did not look so perfectly round and dainty, but she used them anyway. These quiet hours in the morning with my mom were some of my most treasured memories from growing up.  Over time,"Thumbs" became my mom's signature cookie for every occasion. Friends and family would always be asking for Barb's Thumbs! 

Rules of Thumb

These are some of my fondest memories and the cornerstone of the Thumbs Cookies story While I, too, wanted to share theses delicious bite sized, handmade cookies, I also wanted to celebrate the long time traditions of family time in the kitchen, and how that shapes many of us growing up. 

Under my Thumb

After living in Brooklyn for a few years as a struggling actress, I started to bake a lot. I found myself making lots of Thumbs. I started making variations such as Ginger Clove Thumbsand Thumb Pies (little sandwiches filled with chocolate hazelnut). After seeing how happy these little bite sized cookies made people, I wanted to share them with anyone I could!  
Thumb prints...or, Thumbs on a CakeSpy print!
Today, each Thumb is handmade with care. They are delicate, tiny and melt in your mouth. Many say that the taste makes them think of their childhood. That makes me very happy.  I have been working on several additional flavors, but for now I'd like to keep it simple-just as they started. 
Thumbs cookies
How did I market my wares at The Ace Hotel and Bedford Cheese Shop? Relationships. I actually work at The Ace and I am lucky enough to work at a place where people believe in their community and employees. I am a waitress in the Lobby. After the positivity of the first review from the Ace, the GM decided he wanted to order Thumbs Cookies weekly as a hotel amenity. Similarly, Stumptown Coffee at The Ace started to order them weekly as well. I brought them to The Bedford Cheese Shop and they seemed to be a good fit among the other "artisinal" products. The Bedford Cheese Shop has also been incredibly supportive and instrumental in helping me to further develop the  product's packing. 
Say hello to the bakers!
For more info on Thumbs Cookies, including where to buy, visit the website!

A Historical Look at the Mexican Wedding Cake Cookie

Mexican wedding cakes

Ah, Mexican Wedding Cakes: one of my favorite cakes that is not a cake at all, but a cookie!

And oh, what a cookie. These rich cookies rolled in confectioners' sugar to resemble sweet little snowballs crumble in your mouth in the most delightful way: basically butter and (usually) finely chopped nuts held together by flour and sugar, they begin to shatter and disintegrate the moment they hit your tongue. You may know them as Mexican Wedding Cakes. Or you might know them, with slight variations, under another name: Snowballs, Moldy Mice, Bullets, Russian Teacakes, Melting Moments, Mandulás kifli, Polvorones, Sand Tarts, Sandies, Butterballs, Almond Crescents, Finska kakor, Napoleon Hats (whew!). Mexican wedding cakes

These cookies hail from as many countries as they have names: talk about a universal cookie.

Mexican wedding cakes

Considering the many variations, is it possible to connect the cookie to a particular place? Well, you might first look back to sugar-rich medieval Arab cuisine. Sweetmeats, candies, and confections containing nuts (usually almonds) and spices were served at special occasions. Next, you spread it to Europe, a sweet tradition quickly adopted by Moors and taken to Spain. From then on it’s like playing Telephone: the concept of the cookie traveled far and wide, with each region taking on their own variations based on ingredients available at the time. This sweet cookie concept was then introduced to the New World by early explorers. Fast forward, and you've got a cookie tradition that has persisted due to the cookie's relative ease in preparation and simple but ultimately satisfying tastiness. 

Mexican wedding cakes In the 1950s, they started to appear in American cookbooks as Mexican Wedding Cakes, but it seems that it's really just a new name for an old cookie. They're nearly identical to Russian Teacakes, which were a popular dish at noble Russian tea ceremonies in the 1800s. A popular book in Russia from this era, entitled A Gift to Young Housewives, contains several morsels that are constructed similarly; it’s not hard to see how these treats came to be called Russian teacakes. So what's with the name's cultural makeover? I'm wondering if perhaps the name change was a Freedom Fries-esque name change in the 1950s and 1960s, when the Soviet Union and the United States were at odds with one another? It does seem to have coincided with a period during which TexMex cuisine made its entry into American culture in a big way.

But no matter what you'd like to call them, one thing remains true across cultures: these simple cookies are easy to make, and absolutely delightful to eat. Mexican wedding cakes

Mexican Wedding Cakes (Printable version here!)

Makes about 2 dozen 1-inch cookies

  • 1/2 cup unsalted butter
  • 1/4 cup confectioners' sugar
  • 1 cup all-purpose flour, sifted
  • 1/2 cup finely chopped walnuts or pecans 
  • 1 teaspoon vanilla
  • Confectioners' sugar, for rolling

 Procedure

  1. Preheat the oven to 325 degrees F. Line two baking sheets with parchment paper.
  2. In the bowl of an electric mixer, cream the butter and sugar until light and fluffy.
  3. Add the flour gradually, beating well after each addition; pause to scrape down the sides of the bowl with a rubber spatula.
  4. Add the nuts and vanilla; beat just until evenly mixed in.
  5. Shape the dough into balls about 1 inch in diameter and place on the cookie sheets.
  6. Bake for 15 to 18 minutes, rotating the position of the pans halfway through baking; the cookies are finished when they are lightly browned on the bottom and have a dull finish on top.
  7. Let the cookies cool on the pan for 5 minutes before transferring to a wire rack. While the cookies are still warm, gently roll them in a bowl of confectioners' sugar. Tap off the excess, and allow them to cool completely. When cool, roll them in the confectioners' sugar a second time before serving; the first coat tends to slightly melt into the cookie, and the second coat will ensure a pretty, snowy appearance.
  8. Store in a single layer in an airtight container for up to four days.

Pastry Profiles: Hamantashen, Famous 4th Street Delicatessen, Philadelphia

Hamantashen, famous 4th street

I love Hamantashen. Those jaunty hat-shaped cookies may be most strongly associated with Purim, the Jewish holiday, but really, they taste great pretty much any day of the year. And luckily, they're available pretty much any time of the year at a delightful spot called The Famous 4th Street Delicatessen in Philadelphia. 

Famous 4th Street

The famous 4th Street is fantastic for many reasons, but most visually impressive is the sheer size of their baked goods. Seriously, the picture above doesn't quite give you an idea of scale. Their sweets are supersized: their cakes are baked in huge loaves, about 4 times the size of a regular piece of pound cake. Their coconut macaroons are the size of a softball;

Macaroon

the hamantashen measure about 5 inches across. While a mere look at the pricing might seem appalling ($3 for a hamantashen; $8 for an eclair), when considering the size of the goods, it's really quite appropriate.

Famous 4th street

But back to the hamantashen. Recently I picked up a few because I suspected that I would be able to double up and fill both my face and my soul with joy at once. 

Famous 4th Street

I was right.

IMAG1937

I'm not sure what experts would say, but for me, a successful hamantashen has a texture which falls somewhere between butter cookie and scone: very carb-y, lightly crumbly, but not crumble-apart. The Fourth street version managed to heighten my desired texture by attaining a crust that was flaky too. It was brushed with an egg wash for a pretty appearance and a nice light chewiness on top, which ensured that the cookie part crumbled and flaked in my mouth, not my hand. The cherry filling was good without being remarkable; the poppyseed and prune filling was more interesting, with a nice texture from the poppyseeds and the prune added a nice stickiness which contrasted the cookie with its mellow sweetness. It made me want to make like Dorothy in the Wizard of Oz and sleep in all that poppy-fueled joy.

These cookies were perfect when paired with milk, and a delight as both an after dinner treat and a breakfast item. If you love Hamantashen, or think you might be willing to try to love it, Famous 4th street is a good place to try, says this Spy.

Famous 4th Street Delicatessen, Philadelphia; online here. 

Sweet Treats: White Wine Cookies Recipe

Ciambelline

I am not a wine expert. Occasionally a birthday cake or Twinkie expert, but for me, wine is something I enjoy without necessarily having a great deal of knowledge. In fact, if I may, let me share a funny anecdote which illustrates just how much the opposite of a wine expert I am.

One day, I was at a store picking out some wine. As usual, I was scanning the shelves for cool-looking labels and then doing a cross-examination of the bottle's price. If it has a cool label and is under $10, it's great in my book. Choosing one that fit my needs, I plucked it from the shelf, only to turn around and see some dude looking at me. He then said, "you just picked that because of the label, didn't you". Note that it wasn't so much a question as a statement. Yup--busted.

Ciambelline

That tale is meant to amuse you, but also to lead into the fact that when I received some sample bottles from SkinnyGirl wine, I wasn't 100 percent sure how to feel about them. My sister wanted to open and try some, so we did. To me, it just tasted like wine. It didn't taste lower calorie or anything, although technically, it is.

But there was one thing I was sure of, and it was that if I was going to use it for baking, I'd definitely have to fatten it up. Really, there's some logic to this: after all, if you're depriving yourself of all those precious calories in the wine, you'll have to make it up some other way, right? So now, you can have your wine and eat your cookies too.

Ciambelline

And after a quick google search on the subject, I knew exactly how I wanted to do this: by making Italian Wine Cookies. I found a great-looking recipe here, and was happy to discover I already had all of the ingredients on hand, except anise. I don't like anise that much (personal thing), so I used vanilla extract instead.

While it's possible that mixing with a stand mixer instead of by hand made the texture of my cookies a little different, I've got to tell you that taste-wise, they came out very well. This is an intriguing cookie--not extremely sweet, 

Ciambelline - Printable recipe here!

Adapted from Olive and Owl

Makes about 30

  • 3 1/2 cups of flour 
  • 1/2 cup of sugar
  • 1 1/2 teaspoon of anise
  • 1/2 cup of olive oil
  • 1/2 cup of white wine
  •  a little extra wine and sugar for topping

Procedure

In a large bowl, mix together the dry ingredients.

Then pour in the wine and oil and mix by hand or on low speed with an electric mixer until it becomes a dough. It will be a fairly stiff dough. Roll the dough out to about 1/2 inch thickness. Cut into strips about the thickness and length of your index finger, about 3 inches long and 1/2 wide. 

Ciambelline

Wrap the strip of dough around your finger and crimp the ends shut.

Ciambelline

Then place on a baking sheet lined with parchment paper. Bake for 20 to 30 minutes at 350 until golden and crisp. Note: these will be fairly hard--they are a dunking cookie.

Ciambelline

Not necessary, but if you'd like, mix some more wine and a little confectioners' sugar to make a glaze; also not necessary but cute, why not top with sprinkles?

Pastry Pen Pals and Fudge-Filled Dessert Strips Recipe

Fudge Filled Cookie

I have a friend. A very special one. To prove how special he is, I'll show you something that he made me one day. Dear god were they good. The bottom part is a brownie, and the top part kind of tastes like the inside of a Cadbury Creme Egg. When I asked for the recipe, he said kindly but firmly, NO. 

Brownie supremes

Well, I never. But luckily, he has other good qualities. One of them is that he enjoys the life of a Cake Gumshoe, and when he visits Philadelphia, he's willing to go on long bakery jaunts with me.

And on a recent tour of the East Passyunk area of Philadelphia, we tried this cookie at Varallo Brothers Pasticceria. While it may slightly resemble a Fig Newton, I need to tell you that it was a million times better because it was filled with chocolate. 

Fudge Filled Cookie

And as a side note, we also got a cannoli. 

Cannoli

Cannoli

I should further mention that this was all after a slice of pizza from the weirdest pizza place in the world, La Rosa Pizza. Let's just say David Lynch would love this pizza place.

Pizza, La Rosa

But I digress. Back to that cookie. That beautiful chocolate stuffed cookie. At the bakery they just said it was a "chocolate slice", but it seemed to resemble one called cuccidati (though it is traditionally filled with fig, and I don't think there was secret fig in this cookie...or was there?).

Fudge Filled cookie

At any rate, it was a highly enjoyable experience.

So when my friend returned back home, we were delighted to play a little bit of pastry pen pal. I found a recipe (via the book Taste of Home Baking: 125 Bake-Sale Favorites!) for something called "Fudge Filled Dessert Strips", which sounded similar enough to call to mind that tasty chocolate slice. I sent him the recipe, and he made it and sent me pictures so I could share it with you, dear readers.

The cookies are reported as being "extremely dense and decadent", but surprisingly easy to make. The dough was rather easy to work with, he reports, and the finished product perfect with ice cream for dessert, or rather tasty for an indulgent breakfast.

Fudge Filled Cookie

You see, in this pastry pen pal relationship everyone wins, because he got to have a baking adventure and a delicious dessert, and I got a great recipe to post. But wait...where's my dessert? Well, ok, maybe not everyone wins. 

Fudge Filled cookie

But you can be a winner by making a batch! Here's the recipe with some adaptations from the original.

Fudge-Filled Dessert Strips - Printable Recipe here!

Adapted from Taste of Home Baking: 125 Bake-Sale Favorites!

Makes about 3 dozen

  • 1 cup butter, softened
  • 1 package (8 ounces) cream cheese, softened
  • 2 cups all purpose flour
  • 2 cups (12 ounces) semisweet chocolate chips
  • 1 can (14 ounces) sweetened condensed milk
  • 2 cups chopped pecans (original recipe called for walnuts)
  • confectioners' sugar, optional

Fudge Filled Cookie

In a large bowl, cream the butter and cream cheese until light and fluffy. Gradually add flour and mix well. Turn onto a lightly floured surface; knead until smooth, about 3 minutes. Divide dough into fourths; cover and refrigerate for 1-2 hours, or until easy to handle.

Fudge Filled Cookie Fudge Filled Cookie

In a microwave-safe bowl, melt chocolate chips with milk; stir until smooth. Stir in the nuts. Cool to room temperature.

Fudge Filled Cookie Fudge Filled Cookie Fudge Filled Cookie

Roll out each portion of dough on to an ungreased baking sheet into an 11x6.5 inch rectangle. Spread 3/4 cup of the filling down the center of each rectangle. Fold long sides to the center; press to seal all the edges. Turn over so the seam sides are down.

Fudge Filled Cookie Fudge Filled Cookie

Bake at 350 degrees for 27-32 minutes or until lightly browned. Remove to wire racks to cool completely. Cut into 1/2 inch slices. Dust with confectioners' sugar if desired. 

Cake Mix Biscotti Recipe

Biscotti

I have a strange fascination with "doctored" cake mix creations. I love the idea that you can break the rules, so to speak, by using the mix in a way different than its simple intended purpose. In particular I love the recipes that have a finished product that is not cake at all, but cookies or pancakes or bars--it feels like the sweetest sort of kitchen science. So when I was leafing through a book called Complete Cake Mix Magic: 300 Easy Desserts Good as Homemade, I gravitated right toward the cake mix biscotti recipe. 

While the recipe in the book is for a hazelnut biscotti, I decided to go all holiday on this business and bake up some peppermint chip cake mix biscotti instead. Of course, this decision was also fueled by the fact that I had a bag of Andes brand Peppermint Crunch Baking Chips (I haven't seen them in many stores so there's the amazon link) which I thought would be festive and cute to use. 

Let's do this thing.

I also used a smaller box of cake mix than suggested in the recipe, so I scaled the rest of the ingredients down. The resulting biscotti weren't completely beautifully shaped, but gosh, were they tasty. Nice and buttery, like a condensed yellow cake with a crunchy crust, the smattering of mint chips gave the cookies a very nice, rich yet refreshing creamy mint finish on the tongue. Not such a bad thing.

Biscotti Biscotti

Cake Mix Biscotti

Makes about 18

  • 1 package (9 ounces) Jiffy yellow cake mix
  • 1/2 cup all purpose flour
  • 1 egg
  • 1/2 stick butter, melted
  • 1/2 to 3/4 cup Andes peppermint chips

Procedure

  1. Preheat oven to 350 degrees F. Line two baking sheets with parchment paper.
  2. In a large mixing bowl, combine the cake mix, flour, egg, and butter. Beat on low speed for 1 minute or until well blended. Fold in the peppermint chips until incorporated. Divide the dough in half.
  3. On a prepared baking sheet, shape the dough into a 10 by 3 inch rectangle that is 1/2 inch deep. Or you can make two shorter logs of dough, but make sure they have plenty of space as they will spread. Bake for 15 minutes. Remove from the oven and let cool for 10 minutes.
  4. Using a sharp knife, cut each rectangle into 1/2 inch slices. Place slices on their side on baking sheets. Bake, one tray at a time, for 10 minutes. Turk slices over and bake for 5 to 10 minutes longer or until crisp and golden. Cool for 1 minute on baking sheets, then remove to wire racks and cool completely.

Do This: Sugar Cookies with Peppermint Bark

Peppermint Bark Cookies

There really is no reason to improve sugar cookies, because they're already perfect.

But...sometimes even a perfect food likes to get festive for the holidays.

So recently, when I was baking some sugar cookies (because, you know, I was hungry), I thought: why not add a heaping handful of this peppermint bark that Willamette Valley Confectionery sent me? 

Willamette Valley Confectionery

While of course the bark and the cookies were both good on their own, I figured it might taste good to try them together.

Peppermint Bark Cookies

And so, I did.

And when the cookies baked up, they were a wonderful thing to behold. They were awfully pretty, with chocolatey peppermint hued thingies poking through the creamy coloring of the cookies.

But they were even better to put in your mouth.

You know how sugar cookies are awesomely buttery all over, soft on the inside, and lightly crunchy on the outside? Well, add an essence of peppermint to the whole thing, but a nice one, not a toothpasty one. A refreshing minty hint paired with all that buttery flavor? Oh my, were they ever a joy to munch and crunch upon.

So really, this is a long and poetic way of giving you a good cookie tip. Coarsely chop about 2 cups' worth of peppermint bark and fold it into your favorite sugar cookie batter before baking. I'm pretty sure you'll thank me.

Peppermint Bark Cookies

Here's the recipe I used.  

Sugar Cookies with Peppermint Bark

Adapted from Pop Rocks Cookies

  • 1/2 cup (3 1/4 ounces) butter
  • 2/3 cup (4 3/4 ounces) sugar
  • 1/4 cup (2 ounces) buttermilk
  • 1 tablespoon vanilla
  • 2 cups (8 1/2 ounces) King Arthur Unbleached All-Purpose Flour
  • 1/2 teaspoon baking soda
  • 1/4 teaspoon salt


  1. In a large mixing bowl, beat together the butter and sugar till smooth. Add the buttermilk and vanilla, again beating till well-combined. The mixture may look a bit curdled; that's OK.
  2. Add the flour, baking soda and salt to the wet ingredients, and beat until the mixture forms a cohesive dough. Fold in the pieces of peppermint bark. Reserve some pieces to press on top of the cookies (they look cuter that way).
  3. Drop the dough in round blobs onto a parchment-lined or greased baking sheet. They should be a bit bigger than a ping-pong ball, a bit smaller than a golf ball. Using a cookie scoop (or, if you have one, a small ice cream scoop, one that will hold about 2 level tablespoons of liquid) makes this task extremely simple. Leave about 2 inches between the dough balls, as they'll spread as they bake. Let the cookies chill (on the sheet) in the fridge for about 30 minutes before baking. They'll be nicer looking than mine, which I didn't let chill and they spread quite a bit.
  4. Bake the cookies in a preheated 350°F oven for about 12-14 minutes, or when they are just starting to brown. Remove them from the oven, and cool on a rack.

Almond Tuiles with Extra Virgin Olive Oil

Tuiles

If you're busting with sweet curiosity like I am, you're probably looking at the photo above and thinking: "what exactly are those thingies?".

Those lumpy little things are in fact a rather exquisite and refined cookie known as the Tuile.

Now, to say "Tuile", I have a cue to indicate how you should pronounce it. It rhymes with "wheel"; now, say it in your Frenchiest voice. 

Tuile of fortune

I googled "translation of tuile" and the resulting word was "tile". Perhaps this refers to the gentle shingle-like appearance the almond bits give the cookies? Whatever the meaning, these tiles are tastier than your typical siding or bit of caulked home decor.

The recipe was adapted by Alice Medrich (who you may recall I interviewed a while back) who adapted a recipe from The Essential James Beard Cookbook: 450 Recipes That Shaped the Tradition of American Cooking, with olive oil incorporated (you know how I love olive oil and sweets!). Here's what she has to say about it:

Tuile

Crispy crunchy and elegantly thin, these almond cookies were adapted from a recipe by James Beard, using California Olive Ranch Arbequina olive oil instead of butter, and with the addition of a bit of lemon zest and extra salt for a contemporary balance of flavors. Classic tuiles are cooled over a rolling pin to resemble the roof tiles they are named for, but you can skip that step and make them flat if you like, or use my shortcut for making curved tuiles.

Anyhow. As a tuile newbie, I found this recipe decidedly user-friendly. The olive oil makes them seem fancy, so if you have foodie people to impress this holiday season, definitely bring these cookies on. Gently sweet, they'd be just as at-home on a cheese plate as they would paired with ice cream. Now that's versatile.

The recipe below has my notes in BOLD. 

Ingredients Add Almonds Batter Cookies Cooling

Almond Tuiles with Extra Virgin Olive Oil

Makes about thirty 3- inch cookies I got 24 but mine were more like 3.5 inches

Ingredients:

  • 5 tablespoons (60 g) California Olive Ranch Arbequina extra virgin olive oil, plus more for the pan
  • 1/2 cup (100g) sugar  
  • 1 ½ teaspoon grated lemon zest
  • Scant ¼ teaspoon salt
  • 2 large egg whites
  • 1/4  (30 g) sifted* (before measuring) unbleached all purpose flour
  • 1 cup  (90 g) sliced almonds

*if you measure with a scale, there is no need to sift flour before measuring

Equipment:

  • Baking sheets
  • Heavy-duty foil (optional)
  • A rolling pin or cylinder for shaping ( optional)

Procedure

  1. Grease baking sheets with olive oil, or line them with foil, dull side facing up, and grease the foil.
  2. Mix the olive oil, sugar, grated zest, salt, and eggs whites together thoroughly (I used a whisk).  Add the flour and stir until well blended. Stir in the almonds.  Let the batter rest for while the oven heats or for at least 15 minutes.
  3. Position a rack in the center of the oven and heat the oven to 325 degrees.
  4. Drop teaspoons of batter 2 inches apart on a baking sheet.  Use the back of the spoon to smear the batter into a 2 ½ inch round. Bake, watching carefully, for 12-16 minutes, until the tuiles are deep golden brown at the edges and paler golden brown in the center. (If the cookies are not baked long enough, they will not be completely crisp when cool.) I was able to fit 8 cookies per sheet.
  5. As soon as you can push a slim metal spatula under the cookies without destroying them, transfer each cookie to a rolling pin (for curved cookies) or a cooling rack.  If using foil, you can simply slide the foil sheet onto a rack to cool flat, or (for curved) tuiles, grasp the edges of the foil when the sheet comes from the oven (without touching the hot pan or the cookies) and roll it into a fat cylinder, gently curving the attached cookies like potato chips (I think: cannoli shells!).  Crimp or secure the foil with a paper clip. When cool, unroll the foil carefully and remove the tuiles. Flat or curved, tuiles are always easiest to remove from the foil when they are either very hot or completely cool. Do not let them cool too much or they will crack when shaped. I found that it was easiest to bake one sheet at a time for this reason. I used a piece of foil around the round dowel-y part of several wooden spoons to curve them - I found that the curve around a rolling pin was awkward and they tended to break when cooled because they didn’t stack as well as the more curved, cannoli-shell esque ones.
  6. Repeat until all of the tuiles are baked.  To retain crispness, put the cookies in an airtight container as soon as they are cool.  May be stored airtight for at least 1 month.

Holiday Magic Cookie Bars with a Shortbread Crust

Magic Cookie Bars

It's been days, absolutely days, since the Thanksgiving feast, and you're looking awfully skinny.

Luckily, we have officially entered Christmas Cookie Season, so it won't be hard to remedy this situation. My esteemed sugary suggestion? Holiday Magic Cookie Bars with a Shortbread Crust. 

Baked

Now, if you already know what a Magic Cookie Bar (or 7-layer bar, or Hello Dolly Bar, etc) is, then you know that these decadent bar cookies, made with a buttery graham crust topped with a slurry of condensed milk, nuts, chocolate and/or butterscotch morsels, and coconut, are pretty much heaven on earth.

But there's always room for more magic, right? 

I got the idea for these bars when I spied Nestle Toll House Holiday Morsels (have you ever seen them? I hadn't!) in the grocery store, accompanied by recipe cards. Naturally I thought the bars would look adorable all dressed up for the holidays, and considering I still had a ton of shortbread from Walker's Shortbread (who sent me samples, and with which I've already made one of my new favorite things, Million Dollar Shortbread Bars), I decided to do a recipe mashup. 

Shortbread

And I can now report that yes, the bars get even better when you swap the graham crackers for crushed-up shortbread cookies in the crust. This magical union of shortbread, butter, and all of the delightful toppings makes for a sort of no-holds-barred extreme richness on all sides that will make your mouth and soul happy.

These are an ideal morsel for a cookie exchange or holiday party, as they're decadent to eat and festive to look at, too. As for the coconut haters? Sorry, but they're just not the same without!

Here's the recipe, adapted lovingly from "Yuletide Layer Bars" by Nestle Toll House.

Ready to bake Yum

Holiday Magic Cookie Bars with a Shortbread Crust

Makes about 24 - Active time 10 minutes, total time 1 hour 30 minutes, includes cooling

  • 1/2 cup (1 stick) butter
  • Shortbread crumbs (about 2-3 boxes' worth of Walkers Shortbread (I used this kind); less for a thinner crust, more for a nice fat crust)
  • 1 1/2 cup chopped nuts (I used a mix of almonds and walnuts)
  • 1 1/2 cup flaked coconut
  • One bag Nestle Toll House Holiday Morsels
  • 1 can (14 ounces) sweetened condensed milk

Procedure

  1. Preheat oven to 350 degrees F
  2. Melt butter in a 13x9" baking pan in oven; remove from oven. Sprinkle shortbread crumbs over the melted butter; stir well, and press onto bottom of the pan (it might get hot, so press with a sheet of waxed paper or the back of a rubber spatula). Sprinkle the nuts and coconut (make sure they are evenly distributed). Gently, so it doesn't disturb your carefully laid-out toppings, pour the sweetened condensed milk evenly over top in an even layer. If you need to distribute the milk, tilt the pan rather than stirring, as the crust might be torn up if you are too vigorous. Sprinkle the morsels on top.
  3. Bake for 25-30 minutes or until light golden brown. Transfer to a wire rack to cool completely before slicing into bars with a very sharp knife.

CakeSpy Undercover: Grandma's Cookies, St Charles MO

Grandma's cookies

I need to tell you about a place called Grandma's Cookies.

At this magical place in a charming suburb of St Louis, MO, they specialize in--well, cookies.

But here's the thing. The cookies are only about 60 cents each! Well, less than 70 cents each. I forget exactly how much. And they're a pretty good size. In a world where cookies are regularly up to and sometimes even exceed $3.00, this made me like them from the get-go.

Grandma's cookies

And after reviewing the offerings, the unique formation of the chocolate chip cookies made me like them even more. The chocolate chip cookies almost looked like little sun hats: A cookie base, with a cookie lump on top. Oddly, none of the other cookie flavors shared this formation, they were just kind of flat cookies. I'm sure they were good but I zeroed in on the cool (and more bulky) looking chocolate chip cookie. 

Grandma's Cookies, St Charles MO

Look at how it looks in my hand!

Grandma's cookies

Alternate view!

Grandma's cookies

And look how it looks bitten into!

Grandma's cookies

Dude, this cookie was good. And not just "good for 60 cents" good. It was genuinely good. The unique formation gave it a particularly chewy and nearly gooey center, but the edges were crispy. The chocolate chips were ably met by the brown sugary buttery cookie base, and when they came together in my mouth, I felt a moment of pure magic.

A very good cookie indeed. If you find yourself in this charming part of the world, please go there. And buy a baker's dozen of these cookies. It won't even cost that much!

Grandma's Cookies, 401 S. Main Street, St. Charles MO; online here.

P.S. Like the pictures in this post? I took them on my new Intuition phone, part of the Midwest Savvy Gourmets program from Verizon!  Disclosure: I am participating in the Verizon Wireless Midwest Savvy Gourmets program and have been provided with a wireless device and six months of service in exchange for my honest opinions about the product.

Simple but Sweet: Very Nice Cutout Biscuits Recipe

Very nice cutout cookies

Sometimes, you need an over-the top cream-filled and sprinkle-studded dessert.

Well, this cookie is not for that time. This cookie should not be loved any less because of that, however: the fact is, it's a perfectly simple but sweet snacking cookie. In fact, I might go so far as to call it a biscuit, because for some reason I can't shake the idea of pairing these sophisticated treats with English tea.

Very nice cutout cookies

What more can I say about this biscuit? It's the perfect building block for a sandwich cookie or an ideal cookie to garnish an ice cream dessert; it would be wonderful dressed up with a dipping in chocolate and would be a very nice complement to a pot de creme. 

Of course, lightly crunchy and not overly sweet, they make a fine snack all on their own, too. 

No, it's not a showstopper. But this versatile cookie is a good one to have in your back pocket. They're not difficult to make, and the recipe yields a TON of cookies  if you use approximately 1.5-inch cutters. Keep it on file!

Very nice cutout cookies

Pleasant Biscuits

  • 2 1/2 cups all-purpose flour
  • 1 tsp. baking powder
  • 1/2 tsp. salt
  • 1/8 tsp. freshly grated cinnamon
  • 12 Tbs. (1 1/2 sticks) unsalted butter, at room temperature
  • 1 cup sugar
  • 1 egg
  • 1 tsp. vanilla extract

Procedure

  1. Over a small bowl, sift together the flour, baking powder, salt, and cinnamon. Set aside.
  2. In the bowl of an electric mixer fitted with the flat beater, beat the butter on high speed for 2 minutes. Reduce the speed to medium, slowly add the sugar and beat for 2 minutes, stopping the mixer occasionally to scrape down the sides of the bowl. Add the egg and vanilla and beat for 1 minute, stopping the mixer once to scrape down the sides of the bowl.
  3. Stop the mixer and add half of the flour mixture. Beat on low speed until most of the flour has been absorbed.
  4. Add the remaining flour and beat until all of the flour has been absorbed and the dough starts to pull away from the sides of the bowl, 2 to 3 minutes.
  5. Turn the dough out onto a work surface and divide into 2 equal balls. Shape each into a disk and wrap separately in plastic wrap. Refrigerate for at least 2 hours or up to 2 days.
  6. Let the dough stand at room temperature for 5 minutes. Place each dough disk between 2 clean, large pieces of plastic wrap. Roll out the dough to 1/8-inch thickness. (If the dough cracks while rolling, let it stand at room temperature for 5 to 10 minutes more.)
  7. Remove the plastic wrap and place the dough on a floured work surface. Lightly dust the top of the dough with flour.
  8. Preheat an oven to 350°F. Line several baking sheets with parchment paper. Dip cookie cutters in flour before cutting out shapes.
  9. Cut out cookies and transder to the prepared baking sheets.
  10. Freeze the baking sheets for 15 minutes, or refrigerate for 30 minutes. Gather up the scraps, reroll and cut out more cookies.
  11. Bake the cookies until very light golden brown, 14 to 16 minutes. Transfer the baking sheets to wire racks and let the cookies cool to room temperature. Makes many cookies (like 80 1.5-inch round ones).

Sweet to Eat: Stracciatella Truffle-Stuffed Cookies Recipe

Stracciatella truffle stuffed cookies

Now that I've got your attention, let me tell you about something I made.

Recently, Lindt sent me a bunch of samples of their products. White chocolate and stracciatella truffles, in particular. Cool. I like their little Lindt Balls. OK, the technical name is "Lindor Truffles", but I kind of like my name better. But to clarify, even though my chosen name of Lindt Balls sounds like "lint balls", the chocolate variety is much more delicious. Trust me. 

I think Lindt wanted to see what I'd bake up with their treats, or possibly do a review on my site. Well, I don't need to review because I already know I love to stuff my face with these little morsels. Proof:

Stracciatella truffle stuffed cookies

But as for baking with them--after eating several of them straight from the wrapper, I thought "I have an idea". I happened to have on hand a fairly dense cookie dough which I was using to make Hamantashen, and I thought "I wonder what would happen if I stuffed these truffles in that dough?". 

So I cut out some dough rounds and wrapped them around the chocolate balls. I tried to seal them off, but it seemed like a little white chocolate seeped out of most of them. Stracciatella truffle stuffed cookies

In general, though, they all retained enough white chocolate to give the cookies a highly delicious flavor. The cookie dough was fairly dry, but the baby-chocolate chip studded white chocolate centers were moist, and they are seriously an ideal cookie to pair with milk.

Stracciatella truffle stuffed cookies

Go ahead and try them -- I'd be willing to bet that you and your friends will do some serious damage to the batch.

Stracciatella Truffle Stuffed Cookies

Makes 18 or so

  • 3 cups  flour
  • 3 teaspoons baking powder
  • 1/2 cup sugar
  • 1/4 teaspoon salt
  • 3/4 cup butter, room temperature
  • 3 eggs
  • 24 white chocolate or Stracciatella Lindor truffles (why do you need 24 for a recipe that makes 18? Well, you might get hungry while baking!!)

Procedure

  1. Sift together the flour, baking powder, sugar, and salt in a large bowl. Set to the side.
  2. In the bowl of a stand mixer, cream the butter until fluffy. Add the eggs, one at a time, pausing to scrape down the sides of the bowl with each addition. It's gonna look kind of curdled. Don't panic.
  3. Add the dough a little at a time, mixing on low.
  4. Press the dough into a disc, wrap it in plastic wrap, and chill it in the fridge for an hour or so.
  5. Near the end of the cooling period, line 2 sheets with parchment paper. Preheat the oven to 400 degrees F. 
  6. On a well floured surface, roll out the dough to about 1/4 inch thick. You don't need to be too fussy about this though.
  7. Cut out 3 1/2 inch circles using a cookie cutter or the floured rim of a glass. Gather scraps and re-roll as needed.
  8. Place a truffle in the center of each cutout, and gather the dough around it and press it together on top, sort of like a hershey's kiss shape. Try to ensure no holes or openings (this will minimize filling dripping out).
  9. Place the filled dough balls on the prepared sheet, leaving 1.5 inches or so around each cookie.
  10. Bake on a well-greased cookie sheet or on parchment paper for 12-15 minutes. 
  11. Let cool on the sheet for about 10 minutes before transferring to a wire rack to cool completely.