Homemade Ruby Gem Candy a la Erin Bakes

Homemade candy gems

Your snacks should be just as fancy as you are. And you're fancy, I can just tell.

While diamonds are dandy, rubies make a more delightful inspiration for candy. These bright red candy gems look super fancy, but don't require a trip to Tiffany or Cartier to obtain. All you need is a candy mold, a little time, and hopefully some aggression (don't worry, I'll explain). 

Homemade candy gems

This easy and fun craft/snack is inspired by Erin Gardner, a cake decorator extraordinare who led me through the process on her awesome blog, Erin Bakes.

Homemade candy gems

Candy gems

Adapted from Erin Bakes

  • red translucent hard candies (I used Brach's cinnamon candies, but you could use jolly ranchers or life savers)
  • Small zip-top bags
  • Rolling pin
  • a heatproof candy mold with gem-like vessels

Procedure

  1. Position a rack in the middle position of your oven. Preheat the oven to 275 degrees F.
  2. Unwrap a bunch of candies and place them in your sturdy bag.
  3. Using the rolling pin, take out your aggression (remember? You need it now!) on the poor candy that never did anything to you. Go ahead, show it who's boss. 
  4. Since I used a silicone mold, I didn't grease the vessels, but Erin Bakes suggests that if you use a more firm candy mold, you should "Spray pan spray onto a paper towel and use the greased towel to wipe the cavity of your gem mold. This provides enough of a barrier to pop the gem out later, but not so much grease that it makes your gems cloudy."
  5. Fill the molds with your candy bits. 
  6. Gently place the filled molds on top of a cookie sheet, then pop it in the oven. Heat for as little as 5 minutes, or as much as 15 minutes, depending on the sturdiness of the candy you use (start checking after 5 minutes). It will progress from droopy candy to totally melty. Once totally melty, remove the pan from the oven. Erin advises, "If the gem is not as full as you’d like, sprinkle in a little more candy and place the tray back into the oven for another minute or so. Just long enough for the additional candy to melt."
  7. Let the molds cool for several minutes before handling the molds. About 10-20 minutes after they've been removed, your candies will be ready to remove. I simply inverted the mold and kind of squeezed them out. 

Ruby gem candy

You've got yourself a glamorous little snack here! 

White Chocolate Dessert Cups that Look Like Margarita Glasses

Edible dessert cups

Today, let's forget about everything else and focus on a life skill that will serve you as long as you are breathing and are able to feel delight:

How to make edible dessert cups that look like margarita glasses.

This is a riff on a "How to make edible chocolate dessert cups" post I wrote for Craftsy--whilst I was writing it, I realized that, OMG, the plastic champagne coupes I was using as molds actually kind of resembled margarita glasses, too. So I decided to amp up the association by tinting the chocolate so that it would resemble a margarita in a cup.

Don't try to take a sip: this is solid white chocolate, decorated with a salty (that's real salt--I think dessert loves salt!) rim. While yes, it's fine for out-of-hand eating, I think it's extra special when you fill it with a pudding (how about a margarita pudding?), mousse, or even whipped cream. It's a whimsical and true delight-giving treat. 

How to make a chocolate cup

Makes 4-6 dessert cups

Adapted from Taste of Home

Ingredients

  • 12 ounces (1 bag) white chocolate morsels
  • flavorings or food colorings of your choice (optional)
  • coarse sugar for the "rims"

Equipment

  • Dollar store champagne coupes with removable bases

1. Divide the chocolate into two portions: 1/4 and 3/4. I found it easier to melt each batch separately; the small portion plain, and the larger portion with green coloring. You can learn how to melt white chocolate here.

2. Separate the removable bases from the cups of your champagne coupes. Start with four of them, and if you still have a good amount of the mixture when you’ve filled all of them, you can use the other two coupes (this will depend on how thickly you apply the candy).

3. Fill each hollow stem with your melted white chocolate mixture, up the stem. Switch to the green chocolate. Now, use a pastry brush or spoon to brush the sides and "bowls" of the cups (author's note: I started with a spoon for filling the stem, and then graduated to a pastry brush to apply chocolate to the sides of the cup). Set the tops back on the bases (they'll remain upright this way), and place in the refrigerator for about 15 minutes, or until set.

4. Once your 10 minutes are up, remove from the refrigerator and give them a generous second coat with the green, putting emphasis on the sides of the cup. Place back in the refrigerator on the bases until set.

5. Remove the tops from the bases; the chocolate should be set to the point where you can set the coupes on their sides while you proceed. Grab those bases, and invert them.

6. Fill each of the bases with most of the remaining melted white mixture, leveling the top. Place them with the coupes in the refrigerator. You should have a little white chocolate left — keep it on hand.

Chocolate bases

7. Once everything is set (that is to say, the chocolate is completely hard and firm), remove from the refrigerator (to keep things cool, remove the coupes and bases one at a time). Gently, using a sharp knife, ease the edges of the plastic from the chocolate. The pieces should come out without too much trouble.

If the plastic cracks or breaks, that’s ok — you only spent a dollar on these! If there is some breakage on your candy cups, don’t panic. You can place the cracked bit in place, and press it together using the remaining white chocolate mixture as “glue”.

Base attached to top

8. Use a little white chocolate or icing along the edge of the top of the cups, and adhere some coarse sugar along the rim.

9. Adhere the bases and cups using the remaining white chocolate as glue. Let them set again in the refrigerator for about 20 minutes before filling with the dessert of your choice. If not using immediately, let them rest in the refrigerator until ready to serve your dessert so that any ambient heat doesn't make the base and top separate.

What is your favorite whimsical dessert?

Cool DIY Project: How to Make Permanent Marker Mugs

Permanent marker mug

You probably shouldn't believe everything you read on the internet, but usually I do.

So when I came across a tutorial that told me that I could draw on a plain ceramic mug with permanent marker, pop it in the oven for a spell, and when it came out the ink would be baked in, I believed it enough to grab the closest sharpie. My friend, a unicorn named Creampuff, was eager to jump in and help.

Permanent marker mug

By the way, as an aside, if you're wondering how Creampuff got her name, it had to do with this incident:

But I digress. Back to the mugs. Before, this one was plain and boring. Permanent marker mug

So together we drew all over the mug, then popped it in the oven for a while.

When it came out, it was too hot to touch, but after a half hour or so it had cooled. Lo and behold, that ink wasn't going anywhere! (For best results, hand wash). So I'm comfortable passing on this sweet trick I learned from the internet, to you, dear readers!

Permanent marker mug

How to DIY Mugs Using a Sharpie and Not Much Else

Supplies

  • Plain ceramic mugs (colored or white is fine)
  • A baking tray (we used a pie plate)
  • Sharpies

Procedure

  1. Preheat the oven to 350 degrees F.
  2. While the oven preheats, get artistic. I had help from a unicorn, who whispered clever sayings in my ear, but you do the best you can if you don't have a unicorn around. Try not to smear anything--it's somewhat tough on the curved surface!
  3. Permanent marker mug
  4. Place the mug in the center of a baking sheet or pie plate and put in the preheated oven.
  5. Permanent marker mug
  6. "Bake" for 30 minutes. Remove the tray gently. Even though this looks like a mug that you want to touch, DO NOT. It is very hot. I know this sounds dumb but you just wait. You will be tempted to touch it.
  7. Once its' cooled, use as you normally would.Permanent marker mugSo far, mine has proven dishwasher and sink-washing safe. 

UPDATE: After four washings in the dish washer, the pen started to fade off. So for best results, hand wash.

As for the easter paper behind the mug in the pictures? What can I say, the unicorn chose it. They think it should always be jelly bean season. 

How To Write Letters Like a Unicorn: A Tutorial

Unicorn letter

Have you ever wondered how a unicorn writes a letter?

Well, I was hanging out with my pet unicorn, Sprinkle, who helps me with many things, from headstands...

to everyday advice like how to make rainbow jell-o cups or what time of day I'm most likely to see a shooting star with a rainbow trail.

So, me and Sprinkle were having a nice gossip sesh over frosting shots one day, and after maybe one shot too many, she told me the secret way in which unicorns write letters.

Writing letters like unicorns

Because unicorns do not have hands, they do something really special to send their buddies messages. They whisper messages into rainbow rays, and then they wish them over to their friends, who are not only greeted with a rainbow but good tidings.

Listen, I'm not going to lie: humans do not have the magic ability to do this.

But we can co-opt the idea and send a friend a bouquet of rainbows and sweetness by stuffing balloons with little notes and gifts. It basically guarantees a magical day for the recipient. 

Here's how you, as a human without magical abilities, can make it happen.

How to write a letter like a unicorn

You need:

  • a variety of rainbow colored balloons
  • messages or small gifts to put in the balloons
  • tissue paper and packing material
  • a shipping box
  • love

Step 1: Start by preparing a bunch of small notes, like so:

Writing letters like unicorns

You can also grab some other things, like candy or marbles or small things that will make nice little gifts.

Writing letters like unicorns

You can also draw some unicorn horns and includes some of those, too: Writing letters like unicorns

because then the recipient can hold them up to ponies and make them instant unicorns, like so:

A pony no longer!

Step 2: Place the notes or gifties in the balloons. One or two things per balloon. Roll up notes to get them inside of the balloons with ease. 

Writing letters like unicornsWriting letters like unicorns

Step 3: Blow up the balloons. Blow them kind of small, about the size of a large apple or so. 

Writing letters like unicorns

Step 4: Once you have a number assembled, place them in a box lined with tissue paper. Line the sides and top with packing material before sealing and addressing the box.

Writing letters like unicorns

Step 5: Send it on its way! Unlike unicorns, you can't wish your package to its recipient, so you'll have to hit up the USPS or UPS or Fedex. For best results, use a fairly rapid shipping method (such as priority mailing). Be happy in knowing that you will have a very delighted recipient when it's received!

Although this is definitely an adapted version of the unicorn method, it's a highly delightful method of making someone's day brighter. And any unicorn would deem that magical. 

So there we go! And now you know...

Writing letters like unicorns

Who in your life deserves a magical letter? 

Magic in the Airheads: Magical Rainbow Candy Bowls

Rainbow candy baskets

April showers bring May flowers. But let's not get all doom and gloom and April-is-the-cruelest month, OK? Because where there are rain showers, there is bound to be a rainbow or two. Or ten!

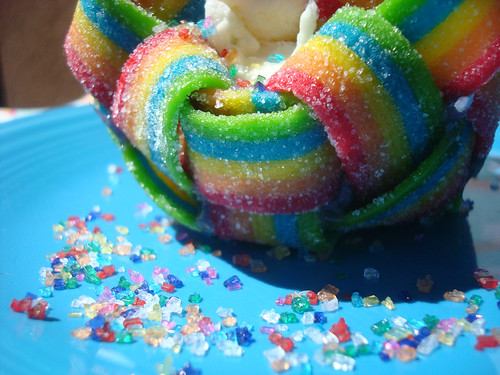
To celebrate this magical rainbow-filled month, I would like to present a project sponsored by Airheads candy which has attained this site's highest status as unicorn-approved: rainbow candy dessert bowls. 

Rainbow candy baskets

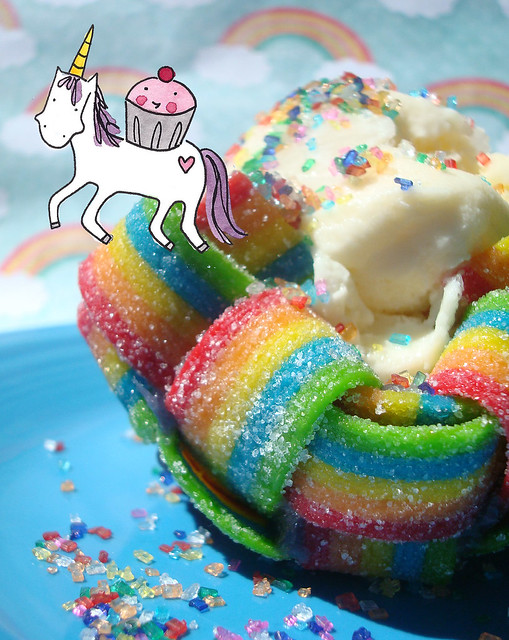
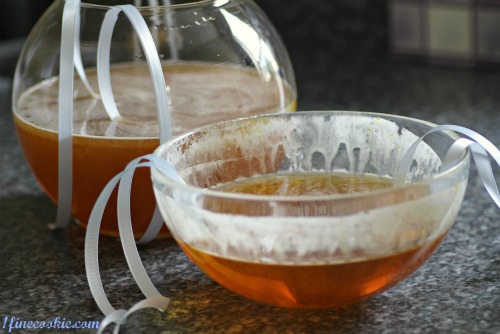
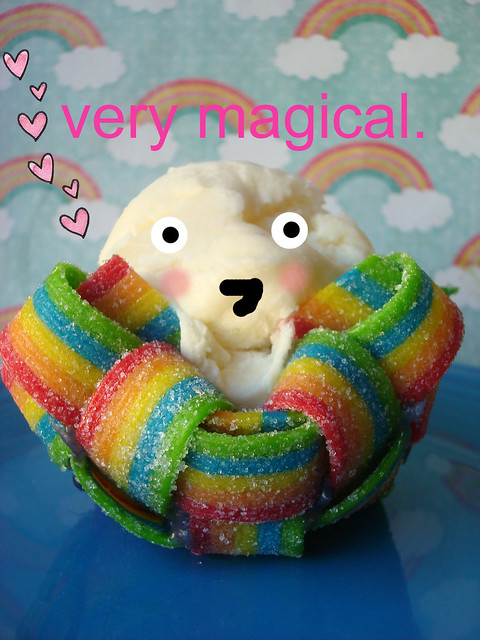
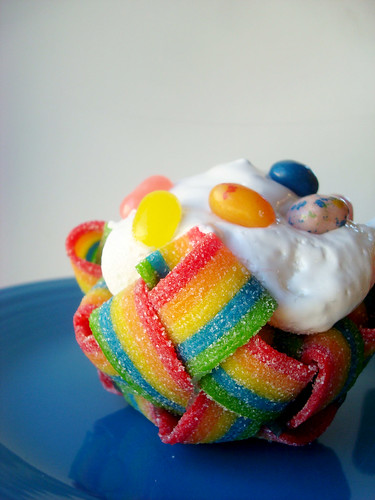
These confections are woven from candy, and are a perfectly magical setting for all of your favorite desserts. You could fill them with whipped cream or marshmallow fluff for a light and sweet cloud-like treat, or you could place an entire cupcake inside. They could even be used as decorative candy bowls at parties for a sweet table setting. 

Rainbow candy baskets

I should tell you too that this project was inspired by my time in Bali. Perhaps not for the reason you think, though! 

You see, I had agreed to come up with a project for Airheads before I left, and I figured "meh, I'll find someone's oven to bake in.". Well, as it turns out, they don't have ovens in Bali! So I had to revise my plans and figure out a no-bake treat. I thought back to my friend Not Martha's bacon bowls and an idea was born--a sweet idea, indeed.

Rainbow candy baskets

I have to say, I was rather pleased with my experimentation. It took a little figuring out, because once I wove the rainbows I had trouble getting them to stay together while I shaped the baskets. By employing regular Airheads candy, I melted them down and then used them as a sort of sealant for the inside of the baskets. It helped keep the candy together, and as an added bonus, sealed the inside so that if eating ice cream or something of the like, it would stay contained in the basket. 

You could go for a plain, cloud-like look with the finished baskets, or include additional rainbows. Definitely not excessive.

Rainbow candy baskets

Anyhow, I know that you're probably keen to make this magic happen in the comfort of your own home, so here's how I did it. I realize it seems like a long process based on my writing, but it's really not; I just wanted to be thorough in my explanations. You're welcome!

Rainbow candy baskets

You'll need:

  • 1 cupcake tin
  • double boiler
  • a spatula for stirring, a spoon, and a knife

Rainbow candy baskets

Ingredients

(Per basket)

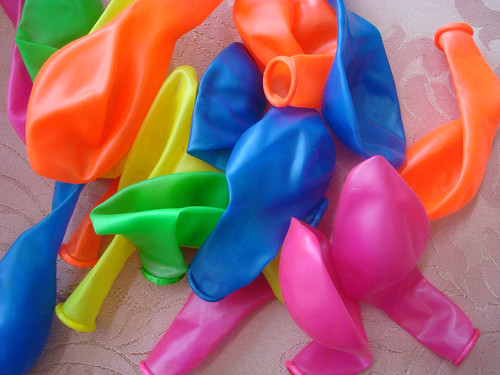
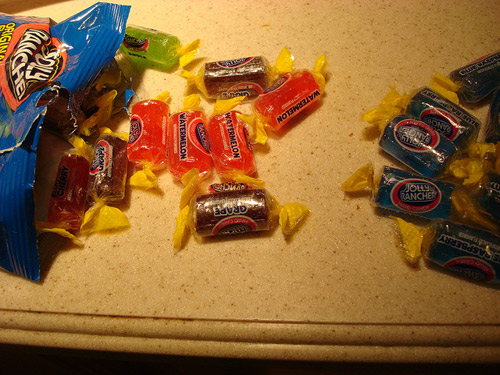
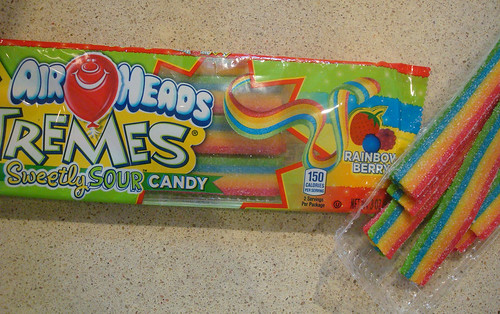
  • 10 strips Airheads XTremes Sweetly sour candy, in berry rainbow
  • 3 small Airheads candies, unwrapped (choose similar colors for best results)
  • 1 teaspoon water
  • 3 2 tablespoons confectioners' sugar

Procedure

Grab a work surface and let's get weaving. First, grab yourself 10 strips of the rainbow colored Airheads Extreme candy. Line five strips side by side, so that the ends are facing you. 

Leaving an inch of space on the top, begin to weave one of the remaining strips of candy horizontally, over and under the vertical rows.

Grab your next piece, and weave it directly below the previous one, weaving under-and-over so that it forms a basketweave pattern.

Continue alternating with the remaining strips. 

Here's a photo-collage of the process if that all seems confusing:

Weaving a rainbow

OK, set this woven piece of rainbow art to the side for the moment. 

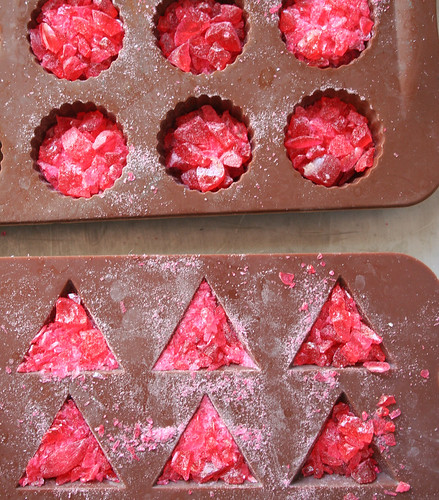
Now, set up your double boiler. Place three Airheads candies (the regular kind) in the top, along with the water and confectioners' sugar. 

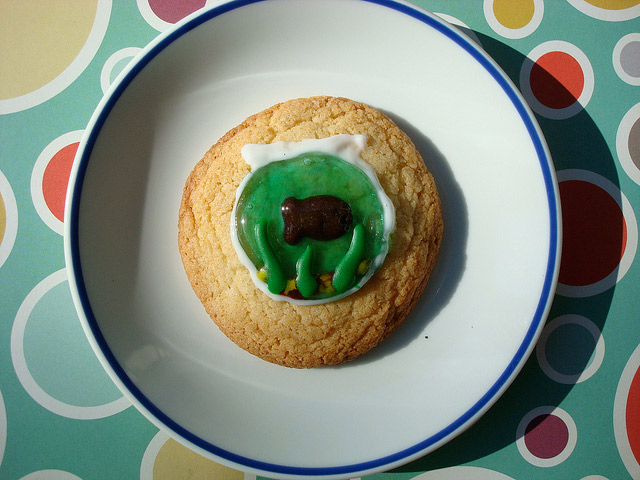
Heat on medium, stirring every few minutes. While at first the sugar, water, and candy will remain quite separate, as it melts, the mixture will become thick. You'll see now why it was a good idea to use candy in the same color scheme--the color melts together. It might be ugly if you use different colored candies (like I did the first time) but it will taste fine. Promise. But even so, this won't be the prettiest part of the process.

Rainbow candy baskets

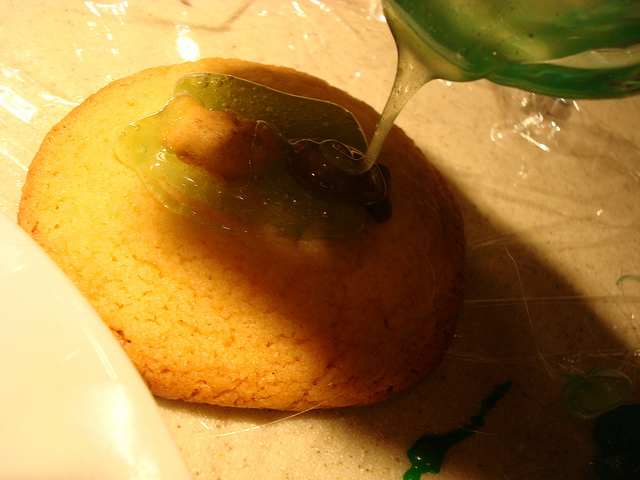
Once the mixture is lightly bubbly, remove from heat. You'll want to work without hesitating at this point as the candy is easier to use while still quite liquid. Gently spoon the candy in the center of your basketweave square. Use a spoon or knife to spread it to cover the woven portion as thoroughly as possible. 

At this point, I decided that rather than slice off the extra bits, I would fold over the non-woven portions. This is easier to do if you start with the pieces which are "under". They will adhere easily to the still sticky candy.

The four corners, I sliced off.

Give it about five minutes for the candy to set slightly, and transfer the candy bundle to your cupcake tin. Gently place it, centered, on top of one of the cups. Using your fingers, gently finesse it into a bowl shape.

Once again, here it all is in pictures. My apologies again for the weird melted candy color. Folding basket

Rainbow candy baskets

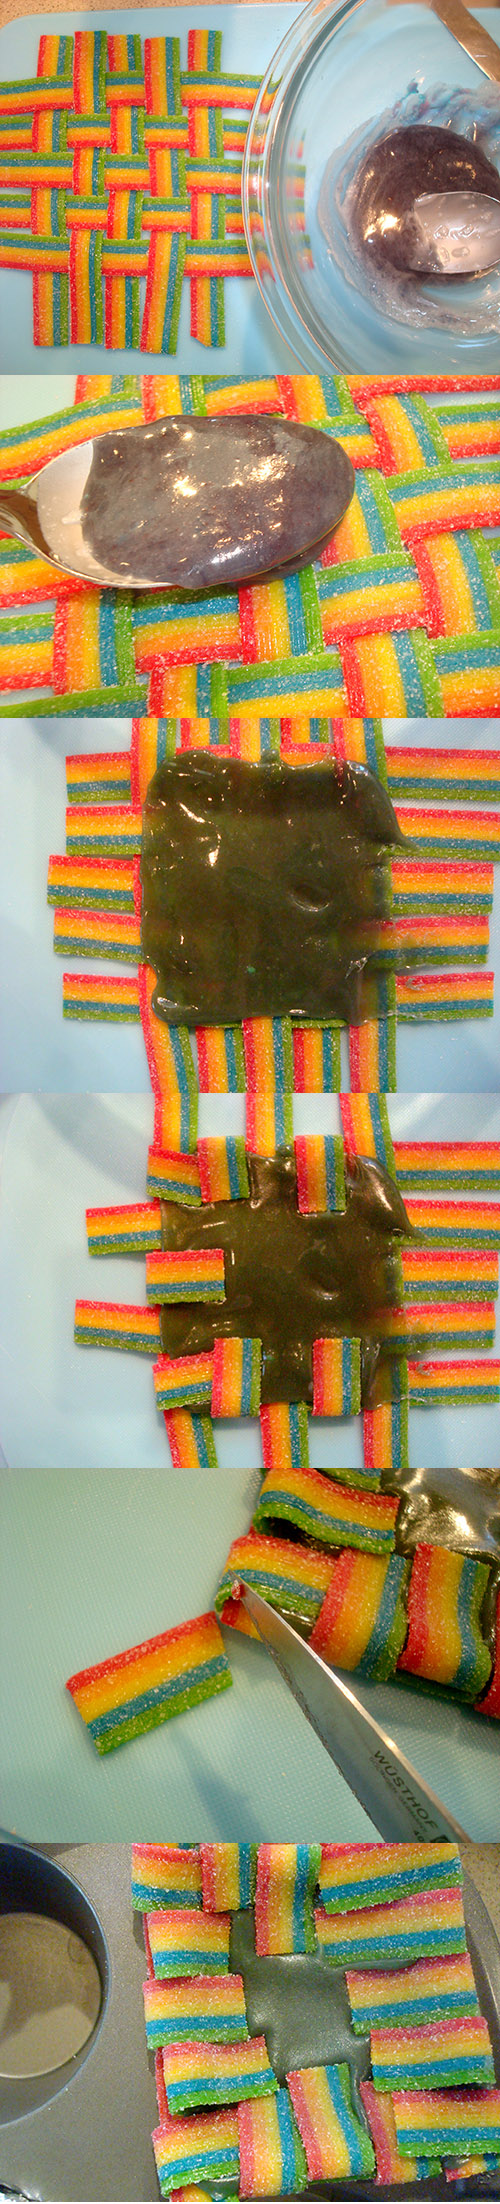
Repeat, making as many bowls as you'd like.

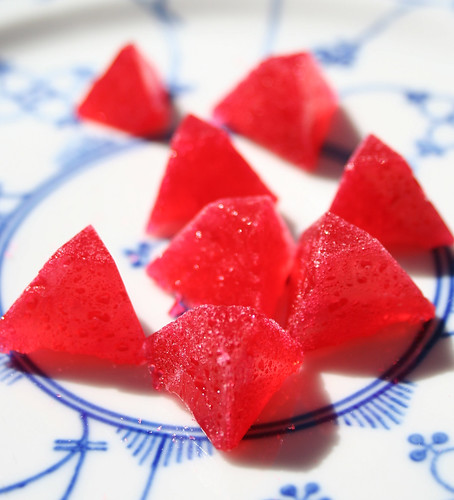
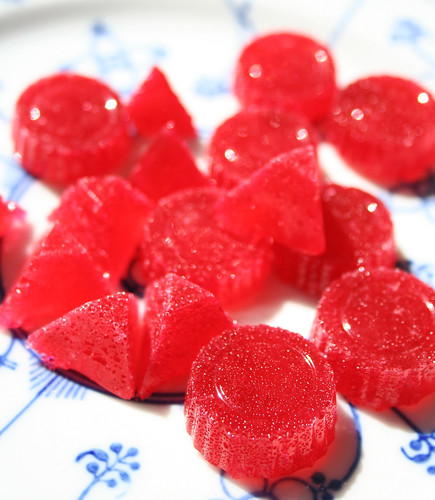
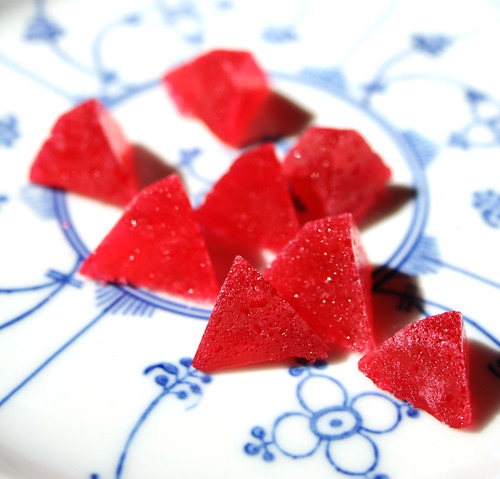
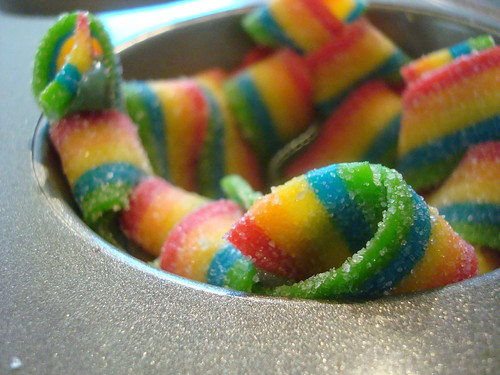
To help the bowls "set", I put them in the freezer (right in the cupcake pan) for about 5 to 10 minutes. They easily popped out of the cupcake tin at this point.

Rainbow candy baskets

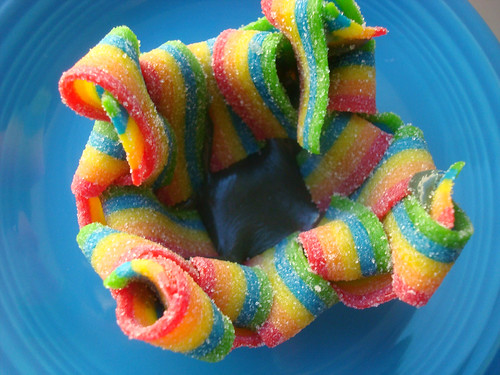
Fill the bowls with whatever toppings you'd like. If you're not using them immediately, keep them in the cupcake tin so that they will retain their shape.

What would you put in a rainbow bowl?

How To Make Edible Rock Candy Jewelry

This necklace is not only delightful, it is delicious.CakeSpy Note: This tutorial is provided courtesy Cake Gumshoe Jasmin, a suspected sweet genius who, among other things, has invented cupcake-stuffed strawberries. Check out her work at 1 Fine Cookie!

It’s fashionable, pretty, tastes good, affordable and easy to make. What’s not to like about 1 Fine Cookie’s rock candy jewelry?

These precious “stones” are made with unique flavors, such as marshmallow, peanut butter and more. The flavor is up to your preference!

Make these for ladies’ night, showers, bachelorette weekends, birthday parties, with the kids, or for Mother’s or Valentine’s day. The possibilities are endless!

The bare-bones basics are listed below; for a more detailed tutorial, visit 1 Fine Cookie.

Ingredients and Tools:

  • clothes pin
  • large glass container
  • ribbon
  • sugar
  • optional but recommended: Torani syrups.
  • optional: food coloring

 Process shot!

How to make it happen

  1. Cook about one part water to three parts sugar. One necklace will be about 1 cup water, as a reference point.

  2. Once the sugar has completely dissolved and simmered, turn off heat and cool. Mix in any food coloring, and a few drizzles of your choice Torani syrup for flavor. 

  3. Soak middle of ribbon (about 2 feet or more) in the sugar water mixture, then coat in sugar overnight until dry.

  4. Place middle of ribbon inside of sugar water, which has been poured into a large glass container. Use clothespins to clip the ribbons and prevent from falling in.

Allow to grow! Move necklaces around a little every day to prevent it from sticking to the sides. While factors will play into how long this will take, including the size of your piece, the humidity, et cetera, you're basically looking at 1-4 weeks.

Cakespy has written permission to feature the recipe, writing and photos of 1 Fine Cookie. Be polite: if you would like to share as well, please visit the website for policies first.


Good Fish: Goldfish Bowl Cookies Tutorial

So, recently I received a review copy of a book called Good Fish: Sustainable Seafood Recipes from the Pacific Coast by Becky Selengut.

Now, I know why I received a review copy. It is because it was put out by the same publisher of my soon-to-be-released book, entitled CakeSpy Presents Sweet Treats for a Sugar-Filled Life, which I might add is available for pre-order (nice plug!). It is also because I am a fan of Becky, who is not only a razor-sharp wit, but a heck of a cook, and a valued customer of mine (she used my cards for her wedding thank you cards, so she is guilty of very good taste).

But here's the thing. There's not one dessert recipe in the entire book. There are quinoa cakes, but of the savory persuasion. But everyone knows that savory cakes are just a good way to warm up your belly for sweet cakes.

So, in Becky's honor, I have created these goldfish-bowl cookies. Employing melted jolly ranchers form a translucent "bowl" over the goldfish crackers which are then finished off with writing icing, these cookies may look fishy, but taste anything but. While I would be lying if I said the jolly rancher taste was totally harmonious with the sugar cookie, it does make them awfully cute, and you can pull off the decoration before eating if desired.

Goldfish Bowl Cookies

 You need:

  • 12 jumbo sugar cookies, about 3 inches in diameter
  • Blue Jolly ranchers or translucent blue or clear candies (about 2 per cookie)
  • Goldfish Crackers (I used the S'more variety)
  • writing icing in various colors, for decoration

 Procedure:

  1. Lay your cookies in a row, and position the goldfish on each cookie in advance.
  2. Get out a small dish. Put about 4 of your candies in it at a time (you can do about 2 cookies' worth at a time; do more and it will get hard too fast). Microwave at medium heat until melted (for me, about 20 seconds). Holding the bowl carefully (you might want a mitt or something to protect you, because it will be hot), pour the candy directly on top of the positioned goldfish, using a spoon to smooth the candy into a circle. Work quickly because the candy will harden rapidly.
  3. Repeat, melting candy in small batches, until all of the cookies are done.
  4. Once the candy is hardened, use writing icing to form the bowl shape more clearly, and to add little fronds or pebbles in the "bowls".Decorating is more fun when you have feathers in your hair.
  5. Serve to your delighted friends after dinner, preferably something like this "heart-stoppingly delicious" dungeness crab mac and cheese from Becky's book, which can be purchased here.

Let it Snow, Man: Snowman Cupcakes from Bredenbeck's Bakery, Chestnut Hill, PA

Winter got you down? Well, here's a way to add some sugar to the cold, dark days: Snowman Cupcakes!

Snowman-ify the cupcakes of your choice with this super-easy tutorial from Philadelphia's Bredenbeck's Bakery--not only is it easy, but it's fun and delicious when you're snowed in.

Here's how you do it.

You’ll need:
  • A dozen of your favorite cupcakes
  • 16 oz. vanilla icing
  • 22 oz. (two packages) white chocolate chips
  • Red shoestring licorice, black gel icing, candies for decorating
  1. Start with your favorite cupcake recipe and bake according to instructions
  2. Flip your cooled cupcakes upside down, and spoon a dollop of icing on top to add height
  3. Place the iced cupcakes in the freezer until icing is firm
  4. Melt white chocolate in a double boiler
  5. Place frozen iced cupcakes on a wire rack
  6. Spoon melted white chocolate over top of iced cupcakes, allowing excess to drizzle through wire rack
  7. Wrap a few pieces of shoestring licorice around for a scarf, create a face, nose and buttons using the black gel icing and candies.

Of course, if you make them, share your pictures with them on the Bredenbeck's Facebook Page for sweet snow day fun!