I'm bringing back this recipe because it's truly THE BEST! This is the only cookie recipe that I *always* make; others come and go.
One of the most wonderful things about a recipe is all the places it can go.
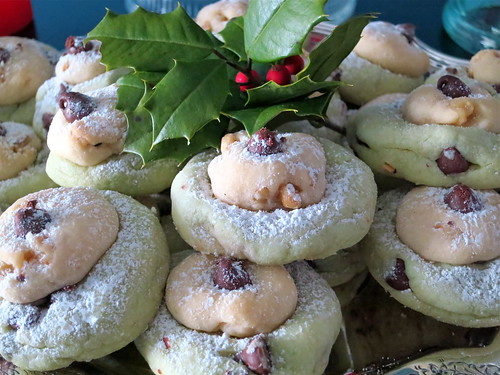
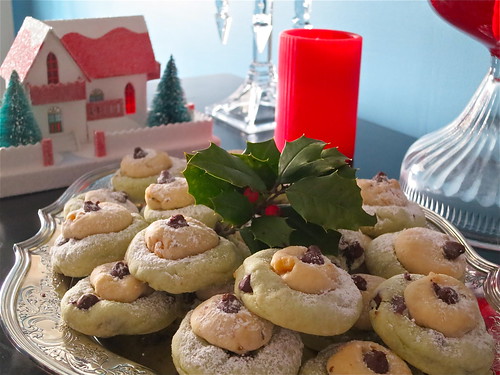
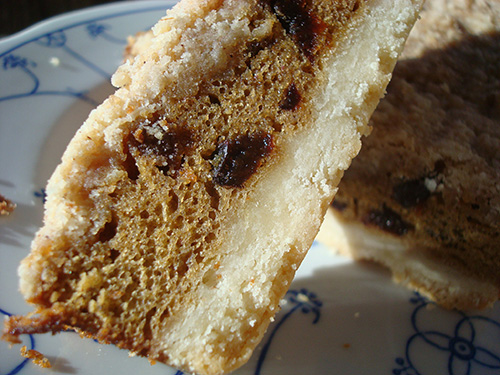
Take, for instance, a recipe for two-tiered Chocolate Chip Pistachio Cookies that appeared in a women's magazine in the early 1980s. How could the recipe developer have known what a role this recipe would end up playing in the Spy family's lives?
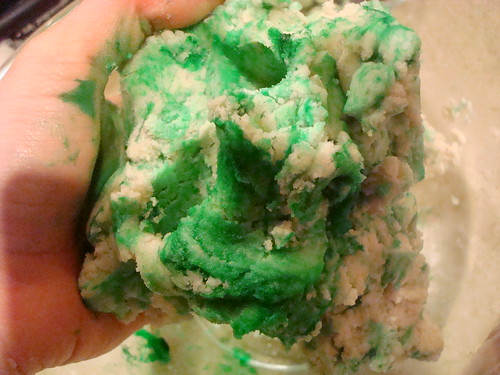
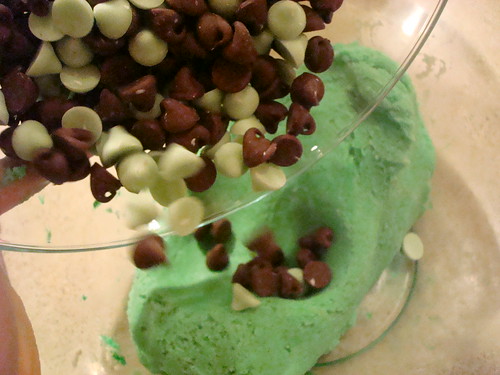
After all, it was this recipe that struck the fancy of my mother (you know her as SpyMom) and intrigued her enough to bake a batch. And the whole family loved them. They were buttery and lightly crumbly but so soft and just ever so slightly chewy in the center, and the walnuts and pistachio and chocolate just worked so perfectly together. We all loved them so much, in fact, that the next year, she made them again. And the year after that. A tradition was born.
But somewhere along the line--was it when her children went to college, moved away, began having their own lives?--the cookies stopped being made. Every year someone (usually me) would lament the fact that they were missing from the festivities, but year after year, they did not make an appearance.
But this year, we brought the recipe out from hiberation. SpyMom found the handwritten recipe and told me that this was during her "penmanship phase", when she would stay up at night practicing perfect penmanship, trying to will her handwriting into something more perfect than it was.
Since then, her handwriting has reverted back to its old, slighly messier, but in my opinion, more charming form.
But how wonderful to encounter this little slice of the past, complete with doodlings (mine? My little sister's?) and speckled with baking debris from years past.
I baked the cookies while my parents were out, and when they returned, my mother shrieked. "What?" I cried out, thinking that perhaps she'd seen a mouse. But no. "They're just like I used to make!" she said. And I may be getting a bit flowery here, but I think that she and my dad both had a little moment, thinking sweet memories. And that made me extremely happy, in turn.
6 ounces (half a bag) semisweet chocolate chips, plus 20-30 chips for garnish
confectioners' sugar, for dusting
Procedure
Preheat the oven to 375 F. Line two baking sheets with parchment paper, or lightly grease them.
In a large bowl, sift together the flour, baking powder, and salt; set aside.
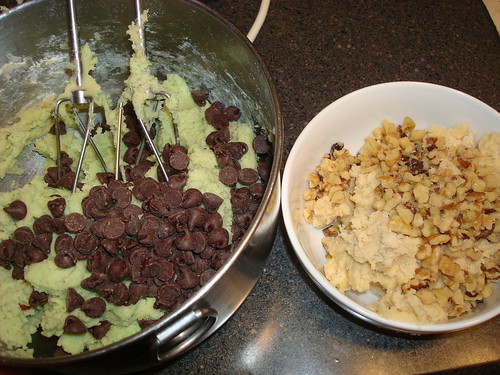
In a separate bowl, using an electric mixer, cream the butter and sugar until smooth, 2-3 minutes on medium speed. Add the eggs, milk, and vanilla; blend until creamy. Add the flour mixture in 3-4 increments, mixing until a stiff dough forms. Remove 1/4 of the dough to a separate bowl; add the walnuts.
To the remaining dough, add the pudding mix and stir until completely combined. Fold in the 6 ounces of chocolate chips.
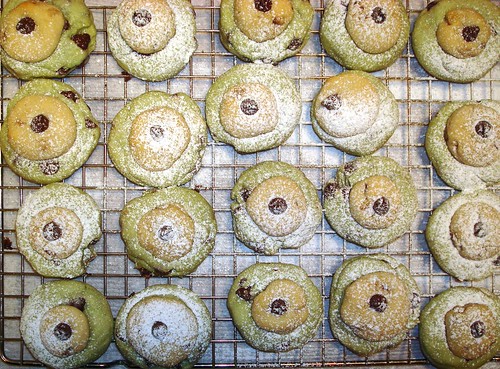
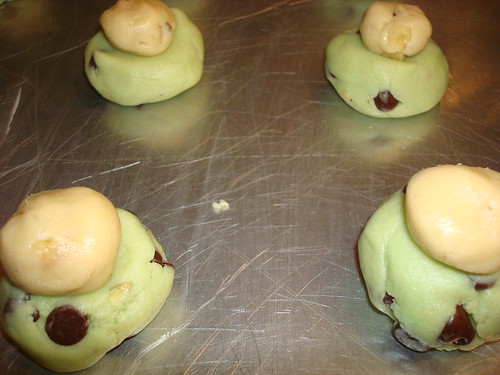
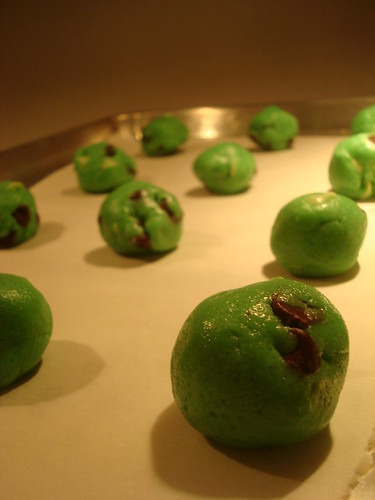
By rounded teaspoonfuls, form the green dough into balls, and place 1 1/2 inches apart on the prepared sheets. Using the back of a teaspoon or a floured drinking glass bottom, gently flatten the tops of these dough rounds.
Grab the small bowl of walnutty dough. Form the dough into marble-sized pieces, and place a ball of this dough on the top of each pistachio dough mound. Sort of like a two-part snowman.
Place a single chocolate chip on top of each of the cookies, pressing gently to make sure it will stay in place.
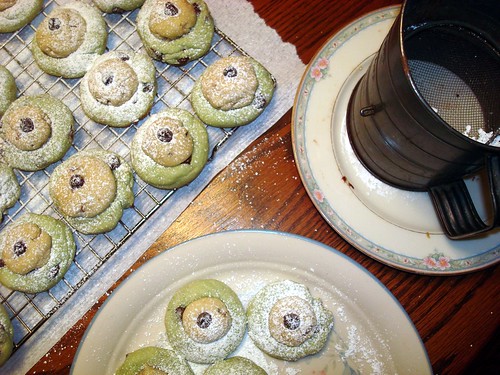
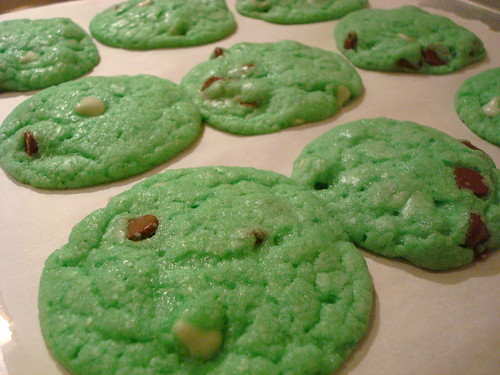
Bake in your preheated oven for 8-15 minutes (listen, that long range is because I never calibrate my oven because I am lazy and I've baked these in a variety of ovens which have ranged though different bake times), or until set. It's going to be hard to see if they have become golden on the bottom, so mainly just look for a matte finish and an ever so slight golden color around the bottom edge. Remove from the oven and let cool on the rack for 5 minutes before transferring to a wire rack to cool completely. If desired, dust with confectioners' sugar.
We love to stuff. We stuff our stockings. We stuff our bras (or at least we did when we were 13). Why not stuff our cookies?
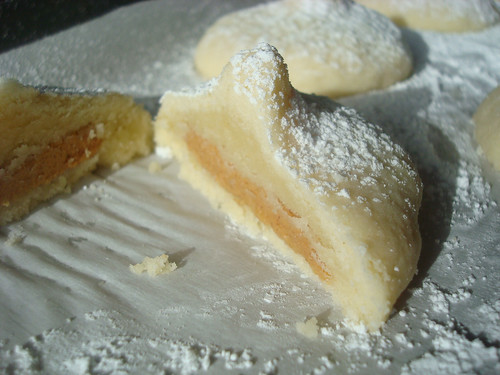
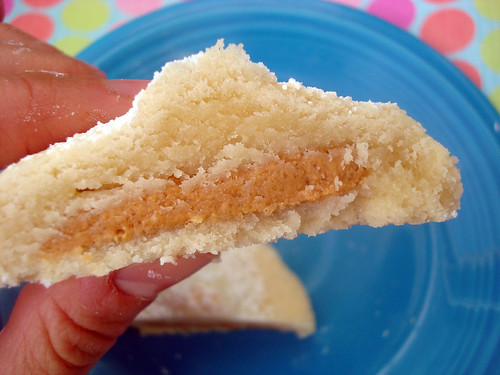
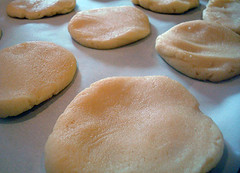
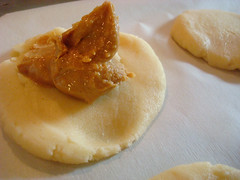
These cookies--and yes, it brings me a shiver of joy to say it--are stuffed with peanut butter. Delicious, creamy, dreamy, peanut butter. This means that when you grab one of these cookies, you're already excited, I mean, cookie! right? But then, when you bite into it, you find that the crumbly exterior gives way to a soft and gooey peanut buttery center. And that is the point which, in some sort of sweet and slightly salty and rich and peanut buttery bliss, you think "it would be OK if I died right now, because I've had this moment".
Am I talking them up too much? Go ahead, find out for yourself. Here's the recipe.
Peanut butter filled cookies
Makes about 20 cookies
1 1/2 cups all purpose flour
1/2 cup cornstarch
1 teaspoon salt
2 sticks unsalted butter, softened
1/2 cup sugar
1 egg
1 teaspoon vanilla extract
1 jar peanut butter (I used Mighty Maple peanut butter by Peanut Butter and Company) (you won't use quite the whole thing)
Preheat oven to 325 degrees F. Line two baking sheets with parchment paper.
Combine the flour, cornstarch, and salt in a medium bowl. Set aside.
In a stand mixer fitted with the paddle attachment, cream the butter on medium-high speed. Once nice and creamy, add the sugar and beat for 3-5 minutes; it will become somewhat fluffy. Add the egg and vanilla extract, mixing until combined. Pause to scrape down the sides of the bowl and mix again to ensure everything is mixed in.
Add the flour mixture in 2-3 increments, mixing at low speed after each addition until combined, and pausing to scrape down the sides of the bowl with each addition. The mixture will come together to form a soft, malleable dough.
Pull a piece of dough, about 2 tablespoons worth, from the bowl. Form a 2-3 inch flat but fairly thick, circle of dough (you can do this one at a time, or make all of your rounds and then proceed).
Place a spoonful of peanut butter on top of the circle of dough. Pull the sides of the dough over the filling to form a soft dome, making sure the dough is covering the peanut butter on all sides (it can melt through if not--you might overload the first one but you'll get a handle for the right amount fast). Pinch the top to seal the cookie–it will resemble the shape of a Hershey’s kiss. You can also seal the cookie flat on top, just do make sure it’s sealed.
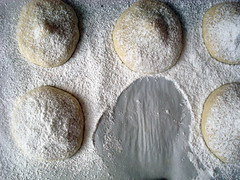
Place the cookies on the prepared sheets, 1 1/2 inches apart to accommodate slight spreading. Bake for 14-18 minutes, or until with a dull finish on top (a golden touch on top is fine, but don’t let them get completely golden or browned). Let them cool on the pans.If desired, dust with confectioners’ sugar. Once they have set for about 10 minutes, you can serve. Keep stored in an airtight container at room temperature for up to 3 days.
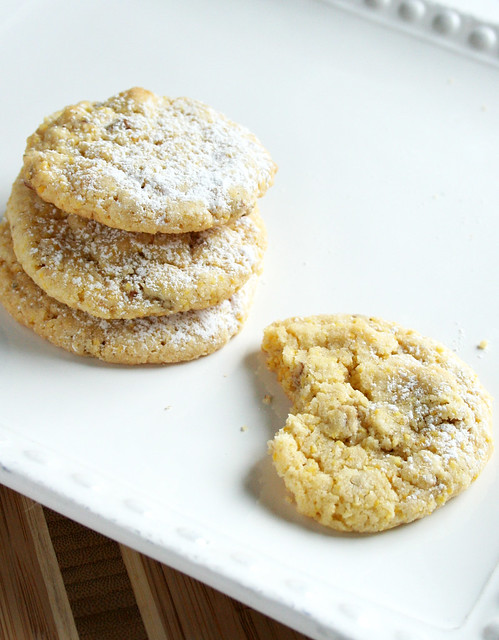
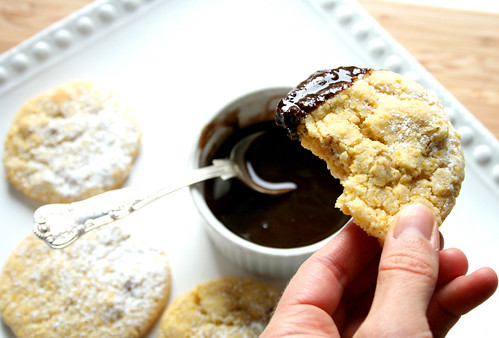
It's been proven time and time again in my life: cornmeal in cookies is a Very Good Idea.
By "time and time again" I mean every time I go to a bakery that has cornmeal-containing cookies. Momofuku Milk Bar and Amy's Bread in NYC are two places I can suggest reliably fantastic cornmeal cookies. They're not the only bakeries that sell cornmeal cookies; in fact, I can't think of a time I haven't enjoyed a cornmeal cookie that I purchased.
In my opinion, the success factors are as follows: the corn-ishness adds a natural sweetness that is a pleasant departure from just sugar-sweetness, and the pleasingly slight gritty texture adds intrigue.
I know I'm not the only cornmeal cookie fan out there, so it's very likely that this recipe will be a welcome addition to many a corn cookie lover's repertoire. These corn cookies have a leg up on most because in addition to sweet cornmeal, they also include pecans, which makes them a touch crunchy. And I don't know why I haven't rhapsodized about the combo of pecan and corn before--united by a buttery front, these are twin quasars of awesome in every bite of these cookies. I want to make cornbread with pecans now! Corn and pecan everything!
Oh, and it's also a good cookie recipe to use up egg yolks if you've been making meringues or another recipe that only contains whites!
Cornmeal Pecan Cookies
Makes about 40
1 1/2 cups flour
1/2 cup yellow cornmeal
1 teaspoon baking powder
1/4 teaspoon salt
3/4 cups butter, at room temperature
3/4 cup sugar
2 egg yolks
1 teaspoon vanilla
1/2 cup toasted chopped pecans
Procedure
Preheat oven to 350 degrees F and line baking sheets with parchment.
In a large-ish bowl, stir together the flour, cornmeal, baking powder, and salt together. Set to the side.
In the bowl of an electric mixer fitted with the paddle attachment, on medium speed, cream the butter and sugar until nice and fluffy. Add the egg yolks and vanilla and mix until blended, about 1 minute.
Reduce speed to low, and mix the flour in, until just incorporated. Fold in the nuts.
Scoop out heaping tablespoonfuls of dough, and form into balls. Place on the baking sheet about 2 inches apart.
Bake for about 15 minutes, or until lightly browned on the edges and set in the center. Let cool on the racks for about five minutes and then transfer to a wire rack to cool completely. If desired, dust with confectioners' sugar. These cookies will keep for a couple of weeks in a sealed container at room temperature, or up to several months in the freezer.
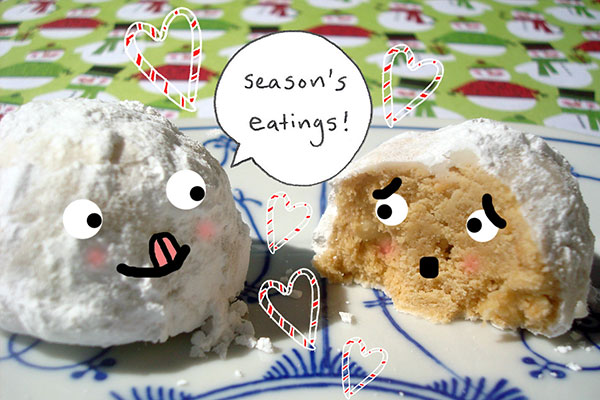
If you need a little Christmas, right this very minute, then this peanut butter snowball recipe is just the ticket to get you on a one way trip to holiday tastiness. It's also my latest creation for Peanut Butter and Company.
These cookies share the classic shape and crumbly texture of snowballs (also called Russian teacakes, Mexican wedding cakes, Armenian sugar cookies, bullets, and, oddly, moldy mice), but they have a taste that is full of peanut buttery goodness. Using crunchy peanut butter ensures good structure and offers enough bulk that they hold their shape; the lack of eggs and leavener keeps the cookies delicate, and distinctly different in character from the type of peanut butter cookies which are cross-hatched with the tines of a fork.
These cookies are a classic kissed with peanut butter to create a true holiday delight. Truth be told, though, I doubt anyone would turn these away at any time of the year!
Let's be honest. When we share our baked goods with others, it's not *only* to unselflessly share sweetness and love.
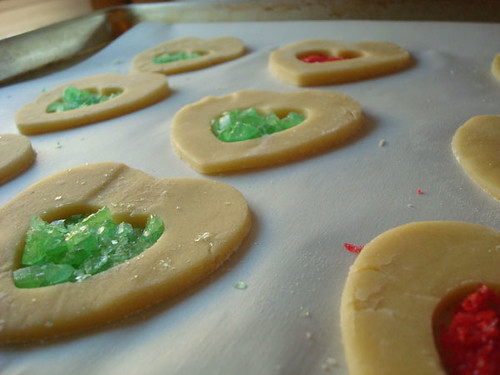
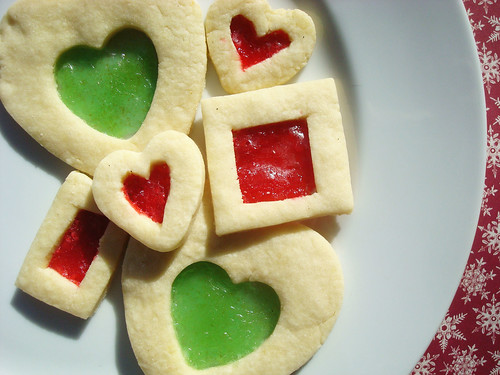
It's also to show off. And for a cookie that is really good for showing off, look no further than these stained glass cookies.
Guaranteed you'll get "oohs", maybe some coos, and a lot of questions about how on earth you did it. You don't have to tell; I'm not the boss of you.
But I will tell you how to do it, right here, right now. You start with a cutout cookie, fill it with crushed candy, bake it up, and voila. Total magic. And they taste good, to boot: buttery cookies with a sweet candy middle in whatever flavor you could possibly desire.
How's that for a Christmas miracle?
Stained Glass Cookies
Makes about 36 2 ½” cookies
¾ cup (1 ½ sticks) unsalted butter, at room temperature
¾ cup granulated sugar
1 large egg
1 teaspoon vanilla or almond extract
½ teaspoon salt
2 ½ cups all-purpose flour, sifted
6 to 8 ounces assorted translucent hard candies, such as Life Savers, divided by color and crushed finely
Procedure
In the bowl of an electric mixer fitted with the paddle attachment, cream the butter on medium-high speed until creamy and smooth, about 2 minutes. Add in the granulated sugar and continue to beat on medium-high speed until light and fluffy, 2 to 3 more minutes.
Reduce speed of the mixer to low, and stir in the egg, vanilla and salt. Scrape down the sides of the bowl if necessary using a rubber spatula. Stir until combined.
With the mixer still on low, mix in the flour in 2-3 increments, pausing to scrape down the sides of the bowl as needed. Once it’s all been added, only mix until the dough comes together and there are no powdery traces of flour left. The dough may feel crumbly, but it should be easy to clump together.
Divide the dough into two halves, and flatten into two disks. Wrap each in plastic wrap, and refrigerate until quite firm, at least three hours or up to overnight.
Near the end of your cooling period, heat the oven to 350 degrees F. Line two baking sheets with parchment paper.
Work with one disk of dough at a time to keep the dough from softening too much. Turn it out onto a lightly floured surface. Using a lightly floured rolling pin, roll the dough to an approximately 1/8″ thickness. Using 2″ to 2 1/2″ cookie cutters, cut the dough into shapes and place on your parchment-lined sheets. Using smaller cutters, cut the centers from each cookie.
Note: If the dough is too firm to roll directly from the refrigerator, let it soften for a few minutes and then try again. It should become easier to roll after a few minutes at room temperature.
Spoon about 1 teaspoon of crushed candy into the center of the cookie (a little more or less depending on the cutout size). You want to evenly cover the cutout portion with crushed candy, so that you can’t see the parchment below the candy and so that it reaches every nook and cranny of the cutout. If any candy-powder gets on the top of the cookies, dust it off.
Bake until just golden at the edges and set on top, 7 to 10 minutes. Let the cookies cool on the baking sheets for 5 minutes before transferring with a spatula to wire racks to cool completely.
Store the cookies, layered between sheets of waxed or parchment paper, for up to a week in an airtight container.
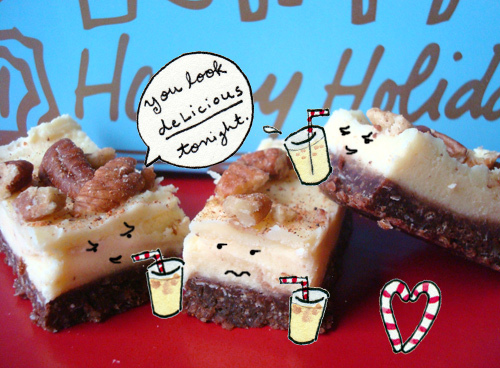
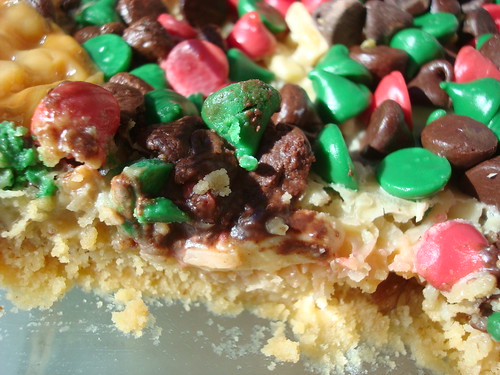
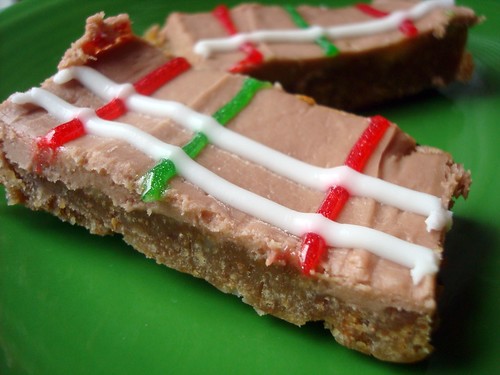
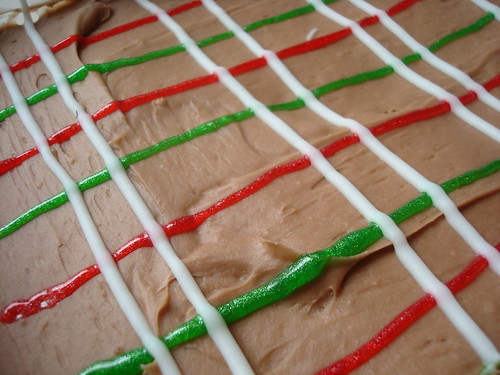
Victoria Weisenberg won first place in 2012 for this recip and her tale of using them to woo "a very special man". Weisenberg created the recipe as a Hanukkah give for her former beau and said the "H" stands for the first letter of his first name, though she opted to leave that name a mystery.
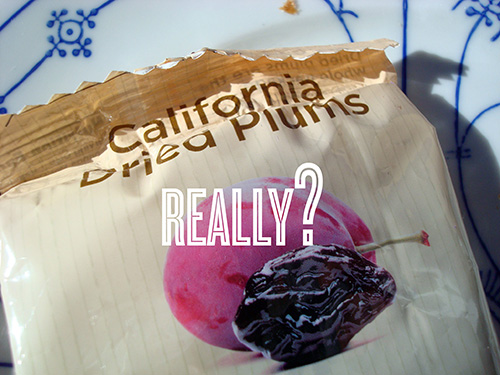
This story is what intrigued me about the bars, which I might have otherwise passed over owing to the fact that they are made with a raisin filling. This t-shirt design sums up my thoughts on raisins in cookies:
Luckily (great timing!) I just received a package from the California Dried Plum Board (no, really). It didn't take me long to decide to swap the prunes for the raisins. I'm glad I did: they add a wonderful moisture and mellow flavor to the bars.
Yes, really.
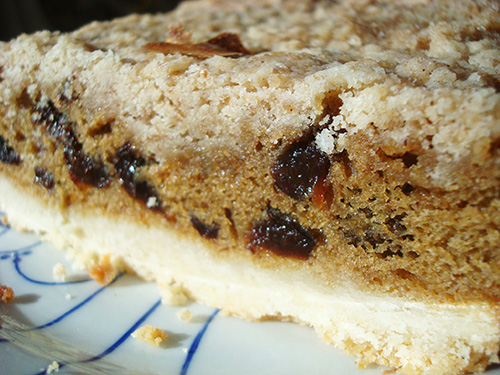
The only other thing I did differently is I baked the bars in a loaf pan rather than the size specified in the recipe. Doing such, I had to increase the bake time by about 5 minutes. I have left the instructions intact though; if you want to make them look like mine, use a loaf pan, increase the bake time, and slice into fingers instead of bars.
Award-winning H-Bars
Yield: 20 bars
Prep time: 30 minutes
Bake time: 37 to 40 minutes per batch
Shortbread base:
1 stick (½ cup) unsalted butter, softened
1 cup flour
¼ cup granulated sugar
Middle layer
⅓ cup flour
¾ teaspoon cinnamon
¼ teaspoon salt
1 cup brown sugar
2 eggs, lightly beaten
½ teaspoon vanilla
4 ounces chopped dried plums (original recipe calls for ⅔ cup golden raisins)
Topping:
½ cup flour
1/3 cup granulated sugar
½ stick (¼ cup) unsalted
butter, softened
1 teaspoon cinnamon
Icing (I omitted this)
½ cup confectioners’ sugar
1½–2 tablespoons milk
¼ teaspoon vanilla
Procedure
Grease or coat with cooking spray a 7½-by-11-inch baking pan. Heat oven to 325 degrees.
For the shortbread, combine butter, flour and granulated sugar in a medium bowl until crumbly. Pack into the prepared pan; bake, 15 minutes.
For raisin layer, stir together flour with the baking powder, cinnamon and salt in a small bowl. In another bowl, beat brown sugar, eggs and vanilla together until blended. Stir in dry ingredients and dried plum bits. Pour over the baked shortbread layer.
For the topping, combine ingredients in a bowl until mixture is crumbly. Sprinkle evenly over the middle layer. Bake, 22 to 25 minutes. Cool.
For the icing, combine confectioners’ sugar, 1½ tablespoons milk and vanilla in a small bowl. Add more milk, if needed, until you get a smooth, easy-to drizzle mixture. Drizzle over the top. Cut into 20 bars.
Food processor method: You do not have to wash the bowl of the processor between steps. Combine ingredients for the bottom layer with a few pulses until crumbly. Pack in pan. Bake as above. Prepare topping in the processor in the same way. Place in a bowl and set aside. Then, place brown sugar, eggs and vanilla in processor bowl and process until blended. Add dry ingredients and pulse a few times. Stir in raisins. Continue as above.
Look, I'm not going to judge you for waiting til right now to start your Christmas cookie baking. I understand that stuff happens.
What I want to do is enable you to make delicious magic for yourself and all your friends, so I have assembled this list of 13 easy, quick, and highly delicious Christmas cookies. You might not be able to make all of them, but at least choose a couple!
1. Snowballs: no matter what you wanna call them, they're an easy, classic, and best of all, crowd-pleasing cookie.
2. Nanaimo bars: Seriously. I can't believe you haven't made these yet!
6. Berlinerkranser: I believe the official translation is "highly tasty cookie".
7. Gingerbread men: or, make them look like characters from a TV show: Gingerbread Mad Men!
8. Candy cane cookies: This is such a nostalgic cookie - give it a try if you've never made them.
9. Jam thumbprints: another classic, these ones are bound to please a crowd. Nutty and with a touch of fruit from the jam, so that means they're health food.
10. Mint candy butter cookies: Great for cookie swaps, or just stuffing in your mouth (let's be honest).
11. Eggnog Nanaimo bars! Seriously. A great accompaniment when you're sloggin' some nog.
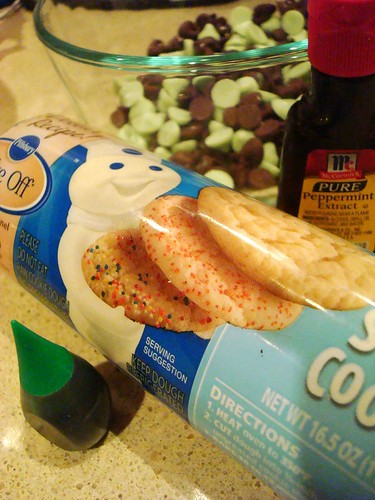
Somehow, it's happened: you find yourself in need of a batch of homemade cookies, STAT. It might be for the cookie swap you thought was tomorrow, not today, or the school party you totally forgot, or maybe you just want to whip up something sweet in record time.
As these cookies prove, a time crunch need not mean that you sacrifice all the fun of baking--they are actually made from "doctored" refrigerated sugar cookie dough. They're assembled in less than five minutes and baked in about 10 minutes--even with cooling time, the process of going from mere ingredients to "let's party" all happens in about 30 minutes.
ALL YOU NEED:
All you have to do? Mix that dough with mint and chocolate chips (they're easily found in the baking aisle this time of year), a teaspoon of peppermint extract and maybe a few drops of green food coloring. Roll into balls and bake as specified on the package. They bake up like a minty, buttery, sweet Christmas miracle!
Mint Chocolate Chip Cookies Using Refrigerated Sugar Cookie Dough
Makes about 24
1 tube refrigerated sugar cookie dough
1 teaspoon peppermint extract
1 cup mint and chocolate chips, mixed together
4-5 drops green food coloring
Preheat the oven to 350 degrees F. Line two baking sheets with parchment paper.
In a large bowl, break up the refrigerated cookie dough by hand. Add the food coloring and peppermint extract. Combine well.
Add the morsels, mixing by hand to knead them evenly but gently throughout the dough.
Divide the dough into 24 equal parts. (First divide in two, then those two pieces into two to make four, then break each of those parts into three pieces, then divide those in two. You'll have 24. Don't get confused.)
Roll each piece into a ball and place on the baking sheet, well spaced.
Bake for 8-11 minutes, or until soft in the center but lightly browned on the edges. I don't know how to say it other than this, but the middles might not look 100 percent set. They will bake a touch more when you remove the cookies, though, so it's ok.
Note: At this point, instead of baking, you can freeze the dough balls on the sheets if you prefer not to bake right now (if you want to do it in the morning, say). Just don't forget to turn off the oven and remember to preheat it again before you bake.
Let the cookies cool on the sheets for 6 minutes before transferring to a wire rack to cool completely. Use a spatula for the transfer; if the cookies seem too soft, wait another minute or two before transferring.
It's been days, absolutely days, since the Thanksgiving feast, and you're looking awfully skinny.
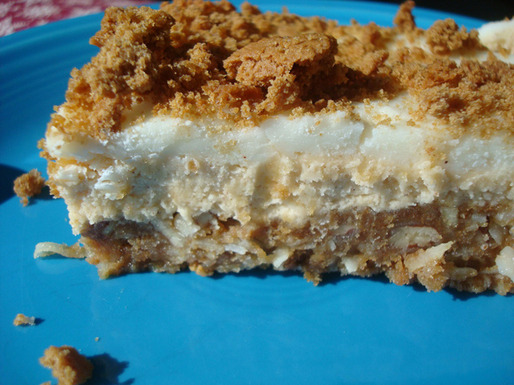
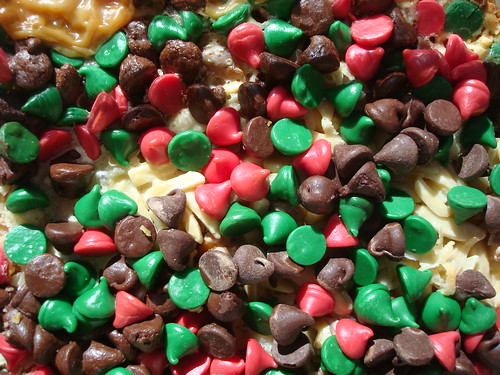
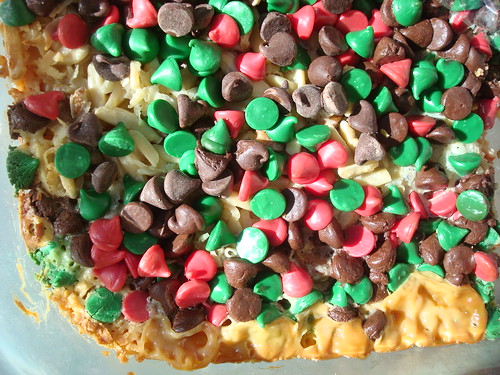
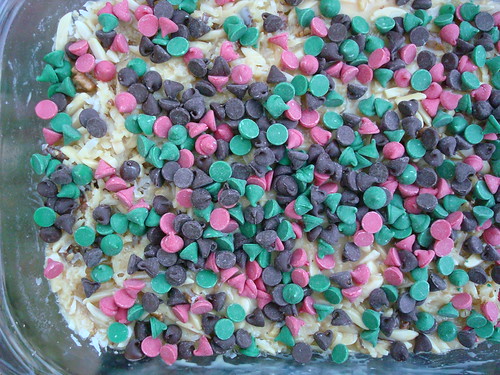
Luckily, we have officially entered Christmas Cookie Season, so it won't be hard to remedy this situation. My esteemed sugary suggestion? Holiday Magic Cookie Bars with a Shortbread Crust.
Now, if you already know what a Magic Cookie Bar (or 7-layer bar, or Hello Dolly Bar, etc) is, then you know that these decadent bar cookies, made with a buttery graham crust topped with a slurry of condensed milk, nuts, chocolate and/or butterscotch morsels, and coconut, are pretty much heaven on earth.
But there's always room for more magic, right?
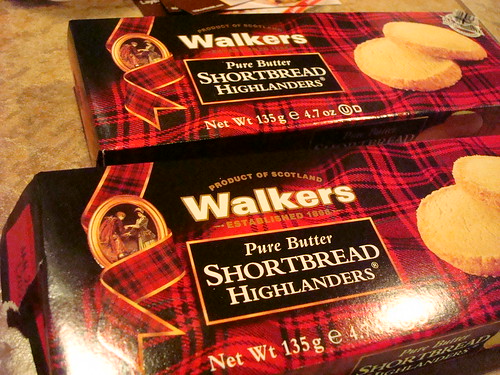
I got the idea for these bars when I spied Nestle Toll House Holiday Morsels (have you ever seen them? I hadn't!) in the grocery store, accompanied by recipe cards. Naturally I thought the bars would look adorable all dressed up for the holidays, and considering I still had a ton of shortbread from Walker's Shortbread (who sent me samples, and with which I've already made one of my new favorite things, Million Dollar Shortbread Bars), I decided to do a recipe mashup.
And I can now report that yes, the bars get even better when you swap the graham crackers for crushed-up shortbread cookies in the crust. This magical union of shortbread, butter, and all of the delightful toppings makes for a sort of no-holds-barred extreme richness on all sides that will make your mouth and soul happy.
These are an ideal morsel for a cookie exchange or holiday party, as they're decadent to eat and festive to look at, too. As for the coconut haters? Sorry, but they're just not the same without!
Here's the recipe, adapted lovingly from "Yuletide Layer Bars" by Nestle Toll House.
Holiday Magic Cookie Bars with a Shortbread Crust
Makes about 24 - Active time 10 minutes, total time 1 hour 30 minutes, includes cooling
1/2 cup (1 stick) butter
Shortbread crumbs (about 2-3 boxes' worth of Walkers Shortbread (I used this kind); less for a thinner crust, more for a nice fat crust)
1 1/2 cup chopped nuts (I used a mix of almonds and walnuts)
Melt butter in a 13x9" baking pan in oven; remove from oven. Sprinkle shortbread crumbs over the melted butter; stir well, and press onto bottom of the pan (it might get hot, so press with a sheet of waxed paper or the back of a rubber spatula). Sprinkle the nuts and coconut (make sure they are evenly distributed). Gently, so it doesn't disturb your carefully laid-out toppings, pour the sweetened condensed milk evenly over top in an even layer. If you need to distribute the milk, tilt the pan rather than stirring, as the crust might be torn up if you are too vigorous. Sprinkle the morsels on top.
Bake for 25-30 minutes or until light golden brown. Transfer to a wire rack to cool completely before slicing into bars with a very sharp knife.
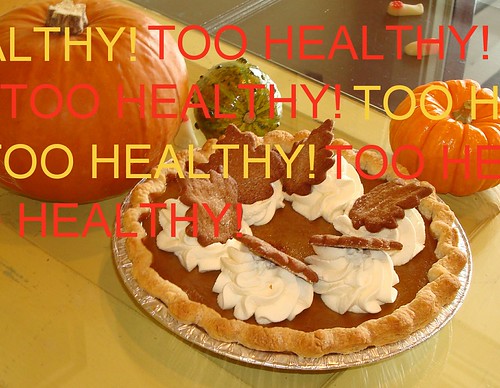
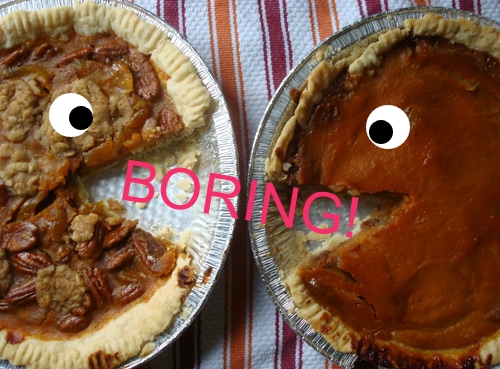
I need to state it directly: it is my firm belief that Thanksgiving pies are boring and overrated.
Don't get me wrong. They are entirely pleasant. They are worthy of respect. They have meaning, both historically and nostalgically. I can appreciate that.
But seriously. Am I the only one that considers them the final barrier, a frumpy and dull diversion leading up to the real sweetness of the season: Christmas cookies?
But I have taken efforts to remove the personal connection to bring you a detailed laundry list of why each pie is overrated.
Let's start with Pumpkin pie. For one thing, it's entirely too virtuous. If you look at the classic Libby's recipe, there's something important missing from the recipe: BUTTER. Sure, you may argue, it's got sugar and milk and eggs and stuff, but I say it doesn't matter. Butter makes it better, and this pie is alarmingly devoid. Add to the fact that it can often be gummy and tastes more like spice than anything else, and you've really just got a vehicle for the whipped cream topping and crust, which should have butter. Or lard.
And don't even get me started on Sweet Potato Pie. Talk about a pie with no personality other than that of the spices which impart flavor and a texture that is just downright weird for a dessert. Sweet potato ought to be relegated to side dish material only. It's way too healthy to be a pie, unless it's a breakfast pie.
Apple pie, that symbol of hearth and home, needs to stop pretending to be dessert. What Apple Pie is, is health food. Apples are too virtuous to be considered dessert, and your butter and sugar would be better used in a batch of cookies. With apple pie, the best part is the crust and the crumb topping.
Pecan pie is on the right track, what with the corn syrup and butter, but is really more of a tooth-number than anything of real interest. Would it kill you to add something--anything--to offer a little flavor contrast? Some chocolate, some cranberries...something.
Also, not that I want to get petty or anything, but as a general note, Thanksgiving pies are just downright homely. Sure, they have a certain je ne sais quoi just out of the oven, while cooling, but you try and show me a pie that's good-looking once cut into. Nope--it all turns into a lumpy landscape of beige and orangey earth-toned stuff.
Christmas cookies, on the other hand, really know how to liven up a table. In festive colors with sparkling sugar and sprinkles, these little nuggets of pure decadent joy form a village of deliciousness when displayed on the dessert table. And we're indulgent. We're full of butter and love and joy, all in easy-to-pop-in-your-mouth-sized servings. We're like the holiday equivalent of the Fun-size candy bar: bet you can't eat just three. Christmas cookies are bountiful, are pretty, are playful in a way that pies will never be.
So, in closing, let me say that I get it. I know I'm not going to change the world with a mere letter to the editor. We all have to pay homage to the tradition of Thanksgiving pies. After all, they are representative of the earth from which our feast comes from, a symbol of survival in the new world. And it's really a rather nice tradition.
But to the cookie enthusiasts out there, those who find the pies, well, just a litting boring--you are not alone. I know that you're all really looking forward to the cookies, and it's only a few days til the season really begins.
Respectfully,
A Christmas Cookie named Snowball
- - - - - - - -
Dear Snowball,
I'd like to make it clear to my readers that your point of view is not intended to be the CakeSpy point of view on the matter. While I can agree that cookies make for a splashier dessert spread visually, we must pause to appreciate the pie.
For one thing, as you do point out, there's the tradition aspect. Pies have long been a symbol of hearth and home, and perfectly suited to this family-oriented holiday. And I beg to differ about the virtuousness of pies. I think that if you were to try the recipes below, you might be singing another tune:
Plus, cookie, you might find that you have more in common with pie than you think. In fact, one of the first cookies my mom used to make during the Christmas season was actually made using the crust from the Thanksgiving pies, which she'd brush with butter and cinnamon-sugar and roll up. Good gravy were those things good. Here's a recipe that is similar.
I think that's proof that we can all get along and co-exist deliciously.
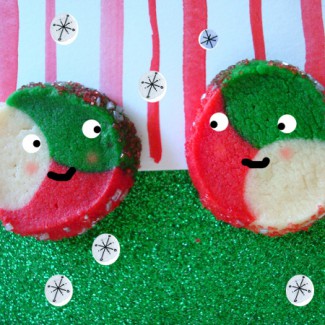
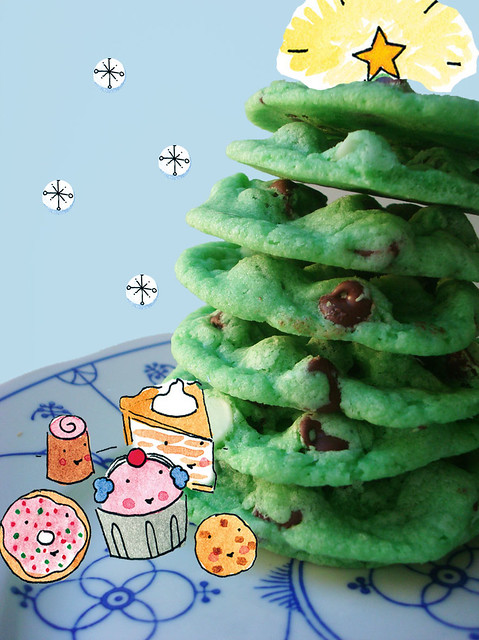
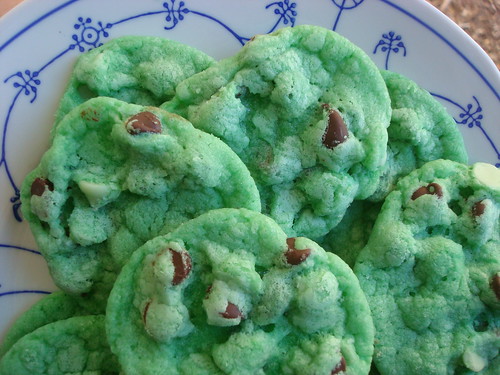
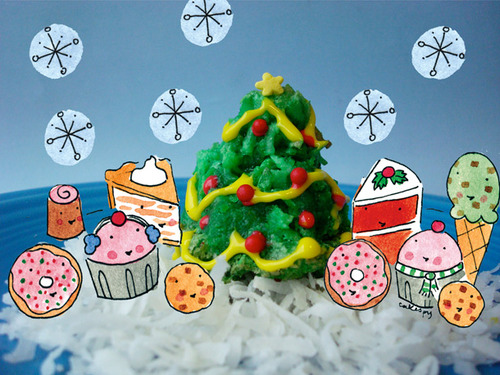
In general, coconut macaroons are not what would be considered a "cute" cookie.
But that's about to change: introducing the Christmas Tree Coconut Macaroon!
These sweet little somethings are rendered adorable simply by tinting the coconut with green food coloring and then decorating with sprinkles and writing icing post-baking. They're fun and easy to make, sweet to eat, and it's a very child-friendly baking project to boot!
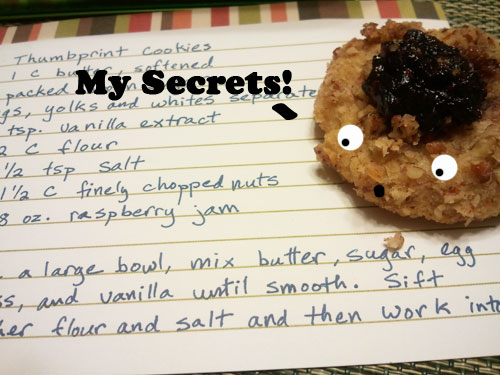
Hi, my name is CakeSpy. And as a professional sleuth of sweetness, I just want to give you fair warning: if you give me a secret family recipe, I will share it.
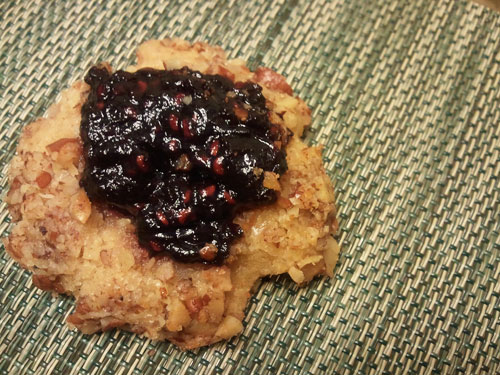
Oh, just kidding. Clearly this recipe, from Cake Gumshoe (and buddy) Alana isn't a big secret, otherwise she wouldn't have given me a recipe card along with the tin of yum she delivered last week, brimming with soft molasses cookies and (my favorite!) jam-filled thumbprints.
And I'm totally passing on the recipe to you, sweet readers.
Alana's No-Longer-Secret Family Recipe for Thumbprint Cookies
1 cup butter, softened
1/2 cup packed brown sugar
2 eggs, yolks and whites separated
2 teaspoons vanilla
2 cups flour
1/2 teaspoon salt
1 1/2 cup finely chopped nuts
8 ounces raspberry jam
Procedure
In a large bowl, mix butter, sugar, egg yolks, and vanilla until smooth. Sift together f lour and salt and then work into batter. Chill dough for at least one hour.
Preheat oven to 375. Form dough in 3/4 inch balls.
Beat egg whites in a bowl with a fork til slightly bubbly.
Roll the balls in the egg whites, then in the chopped nuts.
Place 1 inch apart on an ungreased cookie sheet.
Bake at 375 for 5 minutes. Remove cookie sheet from oven and press the back end of a wooden spoon into the centers of the cookies to form a small indent.
Return cookies to the oven; bake for 8 more minutes, or until golden brown.
Transfer cookies to a wire rack and fill with a generous dab of jam. Let cool.
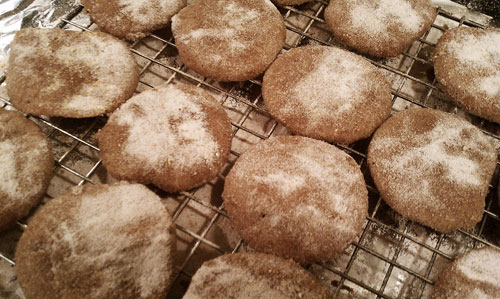
Lucky, lucky you. SpyMom has another sweet holiday recipe to share: Snowy Snickerdoodles. No, you won't get an explanation of where the name comes from, but you will get a recipe that is bound to be delicious, because that's how she rolls.
Snowy Snickerdoodles
Ingredients
1 cup sugar
1/2 cup butter
1 large egg
1 teaspoon vanilla
1 1/2 cups flour
1 1/2 teaspoons cinnamon
1 teaspoon baking powder
1/4 teaspoon salt
cinnamon sugar
Procedure
In a mixer bowl, cream together sugar and butter; beat in egg and vanilla
Combine flour, cinnamon, baking powder and salt
Add to butter mixture
Blend well
Cover and refrigerate 2 hours or till firm enough to roll into balls
Shape dough into small balls about 3/4-inch in diameter
Roll in cinnamon sugar to coat
Set cookies 1-inch apart on lightly greased cookie sheets
Bake at 350° for 10 minutes or till the edges are lightly browned.
Cool slightly on pans, then remove to racks to cool completely.
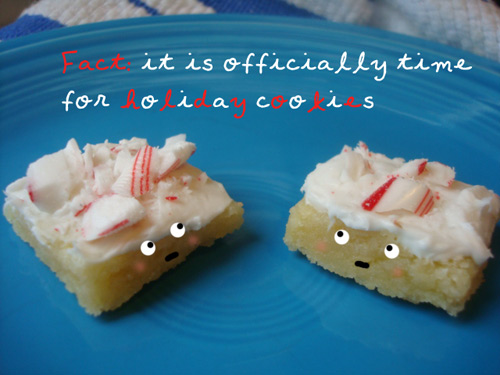
1 1/2 cups mint hard candies or candy canes, crushed
Procedure
Beat the butter and sugar until light and fluffy. Beat in the egg yolk. Add the whole egg, salt, and vanilla, and stir to combine.
Gradually stir in the flour. Form the dough into a flat disk, wrap in plastic wrap, and refrigerate for 30 minutes.
Preheat oven to 350. Get 2 cookie sheets ready to go, no need to grease 'em.
Roll the dough out on a floured surface, to about 1/2 inch thick. Cut into 3-inch squares. Place the squares on the baking sheets and bake for 15-18 minutes, until the edges begin to turn golden. Transfer to a rack to cool completely. (Note: While still warm I cut the cookies into fourths, because I was sharing them at my store and wanted bite-sized cookies)
Cover with icing. While icing is still wet, top with the crushed candies.
CakeSpy Note: This is a post from Cake Gumshoe Megan, who gets in over her head every Christmas...
Despite the fact cake is actually my drug of choice, every year at Christmas I become a cookie dervish. I tell myself it's because I'm developing the repertoire I will be known for later in life, but I think it's really just because I finally have an excuse to bake and bake and bake and no one will ask me what I'm going to do with all of those cookies.
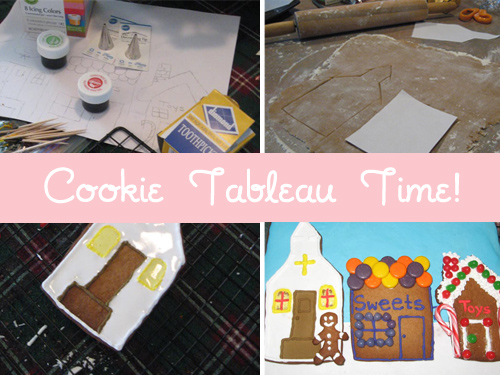
Seventeen or so dozen cookies later (gingerbread, sugar, springerle, candy cane cookies, brownies, chocolate raspberry drizzle, chocolate peanut butter chunk, stained glass, macaroons and chocolate butter snowflakes, if anyone was interested), I turned my attention to a cookie tableau. Reading a Theresa Layman book on gingerbread gave me the idea for a tableau, but I decided to make mine out of sugar cookies and have an undersea theme. I have a very good friend who has been so supportive in pretty much every area of my life, and I knew he'd appreciate something edible for the holidays.
What I didn't know was that Mother Nature was conspiring against me.
The blizzard that dumped two feet of snow on the mid-Atlantic forced me to fly home for Christmas two days early and sent my tableau plans sprawling. The Christmas rush forced me to give a non-edible present to my friend, but I still wanted to make a tableau, so I shifted my sights to a gingerbread winter scene.
A trip to Michael's yielded gel paste food coloring and a foray into Wegmans' bulk candy aisle gave me all the decorations I needed (and plenty to snack on). I ended up using Spree, Jelly Belly jelly beans and candy canes.
I would recommend a little planning with this since my lack of design had me dithering in the candy aisle for longer than absolutely necessary, but if you're at all like me, you can totally do this by the seat of your pants too.
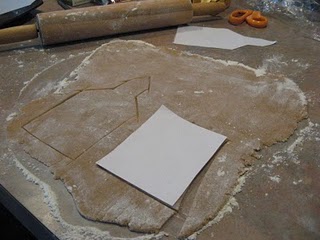
First I used a lebkuchen recipe from Festive Baking by Sarah Kelly Iaia. This is my go-to gingerbread recipe. It uses honey instead of molasses, so you can taste the spices rather than the syrup. I used one whole recipe total in making the background and then the buildings and little gingerbread man. I drew templates free-hand and cut them out with a paring knife.
Baking them in an unfamiliar oven yielded slightly crispy edges, but those were neatly covered by royal icing.
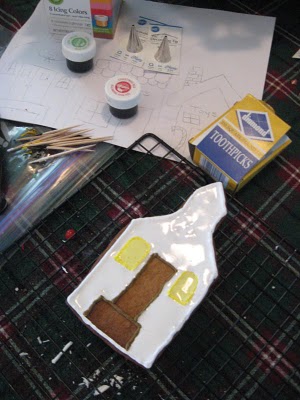
From there I just decorated the buildings as my imagination dictated and space on the background allowed. I did make one mistake which couldn't be fixed due to lack of time. I added too much water to my yellow piping icing, so the windows to the church weren't fully flooded. Some of the "icing" soaked into the cookie.
I also wouldn't recommend taking shortcuts with the icing as I did with the sky. Rather than make a whole new batch of royal icing, pipe a border and then flood, I just flooded the whole thing, which led to rather messy edges. I wasn't too worried about thin coverage in the middle since the buildings were going to cover most of it.
I made a few sugarwork decorations and let everything dry for two days. A little Karo syrup glue to attach the buildings to the background, and I was finished. The final size was about 8 1/2 by 11 inches.
I really enjoyed myself despite a total lack of architectural and drawing skills, and I definitely plan to make another one soon. This time I will have a much more detailed plan beforehand!
Christmas is rich in tradition--and equally rich in cookies (hooray!). But have you ever paused to wonder what the cookie selection might have been like for our ancestors?
Well, in case you had been curious, here is a recipe from what is largely considered America's first cookbook (to clarify, the first cookbook featuring American food published in America--there had been other British books which had been released here previously), American Cookery by Amelia Simmons, which was published in 1796.
If these cookies sound more like hockey pucks than delicious treats to you, please, don't despair--after all, as Amelia advises that "if put in an earthen pot, and dry cellar, or damp room, they will be finer, softer and better when six months old." Whew!
Christmas Cookey
From American Cookery by Amelia Simmons, 1796
"To three pound of flour, sprinkle a tea cup of fine powdered coriander seed, rub in one pound of butter, and one and a half pound sugar, dissolve one teaspoonful of pearlash (a rising agent) in a tea cup of milk, knead all together well, roll three quarters of an inch thick, and cut or stamp into shape and slice you please, bake slowly fifteen or twenty minutes; tho' hard and dry at first, if put in an earthen pot, and dry cellar, or damp room, they will be finer, softer and better when six months old."
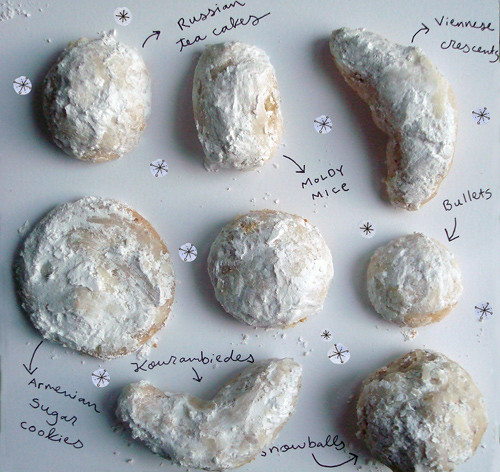
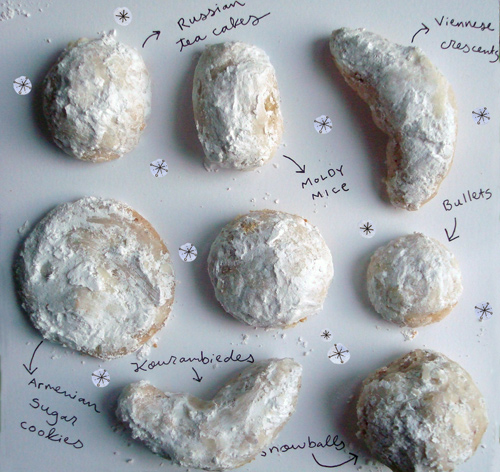
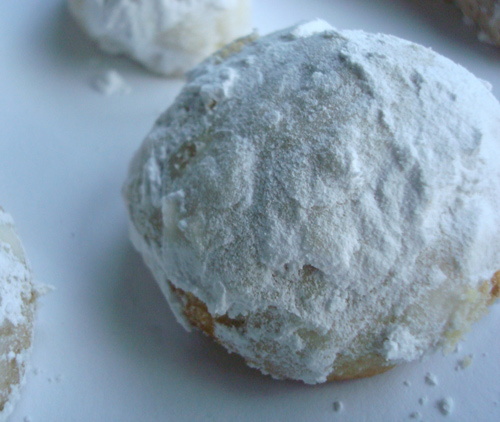
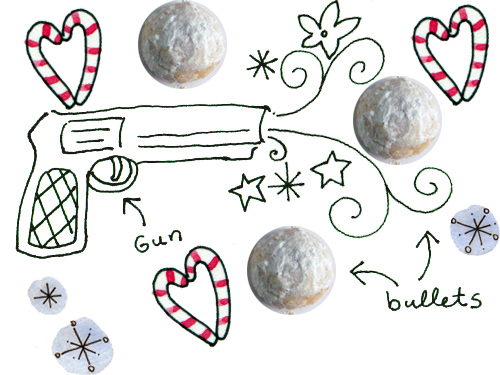
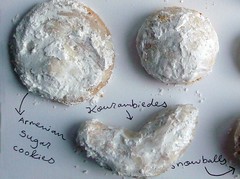
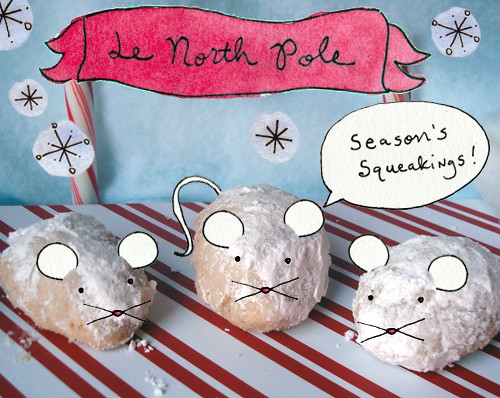
Snowballs. Russian Tea Cakes. Greek Kourambiedes. Bullets. Mexican Wedding Cakes. Viennese Crescents. Moldy Mice. Armenian Sugar Cookies. What does this international sampler of cookies have in common? Quite a bit, it seems--they are just a few (I've counted over 20!) of the countless riffs on the same basic cookie, comprised of butter and (usually) ground nuts, a melt-in-your mouth treat which is liberally coated in confectioners' sugar and seems to be a mainstay in so many special occasions. So what gives? I took it upon myself to learn more about this cookie, ultimately applying the knowledge in the sweetest way possible for the December Foodbuzz 24, 24, 24 project: by taste-testing seven different batches of these international treats with a group of friends and reporting not only on the intellectual findings, but dishing on the goods as well.
But first, a little background. What's up with this cookie? Foodtimeline.org offers up the 411:
According to several food history sources and cookbooks...these are a universal holiday cookie-type treat. This means this recipe is not necessarily connected to any one specific country. It is connected with the tradition of saving rich and expensive food (the richest butter, finest sugar, choicest nuts) for special occasions.
Of course, that having been said, the cookies do perhaps take their root from the Middle East:
Food historians trace the history of these cookies and cakes to Medieval Arab cuisine, which was rich in sugar. Small sugar cakes with nuts (most often almonds) and spices were known to these cooks and quickly adopted by the Europeans. This sweet culinary tradition was imported by the Moors to Spain, diffused and assimilated throughout Europe, then introduced to the New World by 16th century explorers. Sugar cookies, as we know them today, made their appearance in th 17th century. About sugar. Recipes called Mexican wedding cakes descend from this tradition. They first appear in American cookbooks in the 1950s.
See? I bet you're feeling smarter already. And now, Let it snow confectioners' sugar:
Snowballs
About the cookie: This is probably the most famous American version of the cookie--its name seems to stem from their appearance after being rolled in confectioners' sugar. The first mention I could find was a 1939 article in the Chicago Tribune, where it says "don't wait for signs of snow to make these frosty-looking snowball cookies, for they're good in any season". Regional variations will call for filberts, almonds, walnuts, or pecans. Tasting notes: I made the standard-issue version not unlike the ones I grew up with. These ones, made with walnuts, tasted nostalgic, but didn't necessarily separate themselves from the crowd. But still--they were a delight to eat.
Snowball Recipe
Ingredients
2 cups sifted flour
1/4 tsp. baking powder
1/4 tsp. salt
1 cup butter, softened
1/2 cup confectioners sugar
1-1/2 cups chopped walnuts
1-lb. confectioners sugar to roll cookies in
Directions
Sift flour, baking powder, and salt. Mix butter with sugar until very light and fluffy. Mix in flour mixture. Stir in walnuts. Refrigerate until easy to handle.
Make balls in the palm of your hand by tablespoons. Place on a lightly greased cookie sheet, and bake in a 350 degree F. oven until golden brown, being careful bottoms do not burn.
Place confectioners sugar in a large bowl. Take cookies from oven and gently put into bowl. Carefully, they are hot, toss cookies in sugar until they are coated.
- - - - - - - - - - - -
Bullets
About the cookie: These cookies are closely related to the snowball--in fact, I might even surmise that they are a regional version of them, based on the fact that some snowball recipes list a possible variation as using macadamia nuts. However, these ones intrigued me: in the leadup to the recipe, the writer notes that "when we were growing up, my sister Tammie rated these her favorite cookie". Tasting Notes: Clearly sister Tammie knew what she was talking about. These cookies are the absolute lap of luxury. Flavorwise, they couldn't be more rich: the already buttery-tasting macadamia nuts pair perfectly with this buttery cookie, and they really do just crumble in your mouth. Yes, macadamias are expensive--but this one is worth the splurge. These were one of the top two cookies tasted.
Directions Preheat oven to 350. In a medium bowl, beat together butter, granulated sugar and vanilla until creamy. Add flour, beating until well blended. If necessary, work with fingers until dough holds together. Blend in nuts. Shape into one-inch balls. Place 2 inches apart on an ungreased cookie sheet. Bake 15-17 minutes, or until bottoms are golden. Remove cookie sheets; cool on racks. After they have cooled for about 30 minutes, roll in confectioners' sugar, coating completely. Makes 30. - - - - - - - - - - - - Greek Kourambiedes (or Kourabiethes)
About the cookie: On Whipped, the site where I found this recipe, it says "in the bakeries of Greece, the Kourabiethes are piled up high and deep and look like a mound of little snowballs. My trusty, old-school Greek cookbook reads, 'Kourabiethes are the national cookies of the Greeks for Christmas and New Year’s Day.' Tasting Notes: True to Whipped's word, these are truly "Greek little balls of heaven". The rosewater adds a certain je ne sais quoi to the cookies, giving them a unique flavor. I shaped some of these into crescents as well.
Directions Preheat oven to 350 degrees. Mix butter and 1 cup sugar until very light and fluffy. Stir in egg yolk and brandy. Mix sifted flour and baking powder in a separate bowl. Mix in the flour and baking powder a little at a time until dough no longer sticks to your fingers. Mix in almonds while mixing in flour, accomodating for the extra ingredient and not letting the cookies get too dry. Knead well until dough is smooth and can easily be rolled; shape into balls or crescents--follow your bliss. Place on parchment paper on a baking sheet. Bake for about 15-20 minutes or until very light brown. While still warm, brush very lightly with orange flower or rose water. Roll in confectioner’s sugar and set on a tray or plate. Use the remaining sugar to sift over top until well covered. - - - - - - - - - - - -
Mexican Wedding Cakes
About the cookie: Per Foodtimeline.org,
The cookie is old, the name is new. Food historians place the first recipes named "Mexican wedding cakes" in the 1950s. Why the name? Our books and databases offer no explanations. Perhaps timing is everything? Culinary evidence confirms Mexican wedding cakes are almost identical to Russian Tea Cakes. During the 1950s and 1960s relations between Russia and the United States were strained. It is possible the Cold War provided the impetus for renaming this popular cookie. Coincidentally...this period saw the mainstreaming of TexMex cuisine into American culture.
Tasting Notes: What set these cookies apart was the addition of cinnamon--they added a spicy holiday flair to the cookies and really set them apart from the rest. As you can see by the photo, even pugs couldn't avoid the holiday charm of these cookies.
Using electric mixer, beat butter in large bowl until light and fluffy. Add 1/2 cup powdered sugar and vanilla; beat until well blended. Beat in flour, then pecans. Divide dough in half; form each half into ball. Wrap separately in plastic; chill until cold, about 30 minutes.
Preheat oven to 350°F. Whisk remaining 1 1/2 cups powdered sugar and cinnamon in pie dish to blend. Set cinnamon sugar aside.
Working with half of chilled dough, roll dough by 2 teaspoonfuls between palms into balls. Arrange balls on heavy large baking sheet, spacing 1/2 inch apart. Bake cookies until golden brown on bottom and just pale golden on top, about 18 minutes. Cool cookies 5 minutes on baking sheet. Gently toss warm cookies in cinnamon sugar to coat completely. Transfer coated cookies to rack and cool completely. Repeat procedure with remaining half of dough. (Cookies can be prepared 2 days ahead. Store airtight at room temperature; reserve remaining cinnamon sugar.)
Sift remaining cinnamon sugar over cookies and serve.
- - - - - - - - - -
Moldy Mice
About the cookie: This is a rich, buttery pecan cookie smothered in confectioners' sugar, which to the best of my knowledge first cropped up under this name in a 1950 Junior League cookbook entitled Charleston Receipts. What of the name? As you can read on Serious Eats (where you can also find the recipe) I have two theories: first, if you squint really hard at the cookies, they sort of resemble tiny mice covered with mold. Second--my favored theory--is that it is a clever deterrent technique dreamed up by a baker frustrated by their delectable morsels disappearing too quickly. Tasting Notes: These rich, tender cookies were a big hit: toasting the pecans before baking really added something.
Noble Russian cuisine (along with every other facet of noble life) was influenced by prevailing French customs during the 18th century. Tea was first introduced to Russia in 1618, but the Russian tea ceremony of samovars and sweet cakes was a legacy of Francophile Catherine the Great in the 18th century. It is interesting to note that A Gift to Young Housewives, Elena Molokhovet [1870s popular Russian cookbook] contains plenty of recipes for a variety of small baked goods, none specifically entitled Russian tea cakes. There are, however, several recipes which use similar ingredients.
Tasting notes: What can be said? This recipe is a classic.
Mix butter, 1/2 cup powdered sugar and the vanilla in large bowl. Stir in flour, nuts and salt until dough holds together.
Shape dough into 1-inch balls. Place about 1 inch apart on ungreased cookie sheet.
Bake 10 to 12 minutes or until set but not brown. Remove from cookie sheet. Cool slightly on wire rack.
Roll warm cookies in powdered sugar; cool on wire rack. Roll in powdered sugar again.
- - - - - - - - - - - -
Armenian Sugar Cookies (Shakarishee)
About the cookie: This is a traditional cookie, called shakarishee, which I am told is a commonly served item at weddings or other special occasions. Tasting Notes: Sweeter than some others, this recipe yielded a cookie that looked more like a drop cookie when baked rather than holding a snowball shape; the nuts were only an accent in this version, but what held true to all of the other recipes was the texture, which was crumbly and dense and delicious. Taster Jasen, who is himself Armenian, commented that "these make me feel like I should be at an Armenian wedding".
In a large bowl, beat together the butter, egg yolk and the sugar until smooth and almost white in color. Add flour and blend well. If you are using the nuts, this is the time to add them in. Shape into small rectangles about 3/4" by 1 1/2".
Bake on an ungreased cookie sheet and bake for 15-20 minutes or until lightly browned on the sides. Note: The recipe notes that a blanched almond or walnut half can be placed on top of the cookie before baking, but for uniformity I did not add this.
- - - - - - - - - - - - Viennese Crescents
About the cookie: Well, it seems that Vienna has a bit of a history with delicious crescents--could the shape of this cookie be connected to the other famous crescent from that fair city, the croissant? Read on for Wikipedia's roundup:
Fanciful stories of how the kipfel - and so, ultimately, the croissant - was created are culinary legends, at least one going back to the 19th century. These include tales that it was invented in Europe to celebrate the defeat of a Muslim invasion at the decisive Battle of Tours by the Franks in 732, with the shape representing the Islamic crescent;that it was invented in Vienna, Austria in 1683 to celebrate the defeat of the Turks to Polish forces in the Turkish siege of the city, as a reference to the crescents on the Turkish flags, when bakers staying up all night heard the tunneling operation and gave the alarm; tales linking croissants with the kifli and the siege of Buda in 1686; and those detailing Marie Antoinette's hankering after a Polish specialty.
Tasting Notes: This is a winner. The almonds paired with almond extract was an idea I got from Cook's Illustrated, and it really did give the cookies a full, almond-y flavor and helped balance out the fact that almonds are a drier nut than some of the more smooth, buttery varieties I had tried in other recipes. These were simply lovely.
Viennese Crescents Recipe
Makes about 36
2 cups all-purpose flour
1 cup butter
1 cup ground almonds
1/2 cup sifted confectioners' sugar
1/8 teaspoon salt
1 teaspoon vanilla extract
1/2 teaspoon almond extract
2 cups sifted confectioners' sugar
Directions
Preheat oven to 350 F.
In a large mixing bowl, combine flour, butter, nuts, 1/2 cup confectioners' sugar, salt, almond extract, and vanilla. Hand mix until thoroughly blended. Shape dough into a ball; cover and refrigerate for about an hour.
Remove dough from refrigerator and form into 1 inch balls. Roll each ball into a small roll, 3 inches long. Place rolls 2 inches apart on ungreased cookie sheet, and bend each one to make a crescent shape.
Bake 15 minutes in the preheated oven, or until set but not brown.
Let stand 1 minute, then remove from cookie sheets and place on racks to cool. After about 30 minutes, dip cookies in the confectioners' sugar to coat them. If not served right away, dip them again directly before serving to ensure a snowy coating.
- - - - - - - - - -
So, to sum it all up? It was particularly sweet to see how this cookie transcends so many borders: even though our cultures may be very different, we all have some sort of variation of this cookie in common. Regardless of the language you speak or the culture you come from, a cookie made of butter, ground nuts, and coated in confectioners' sugar is a type of equality that is within reach for everyone: easy to make, and completely delicious.
Ah, Christmas Cookie Season, that decadent and delicious time of year when moderation is thrown out the window. Sweet, sweet Christmas cookie season.
And in that spirit of rich decadence, here's a sweet little confection I recently made for the C+H Sugar Holiday recipe spree (full disclosure--they gave me a $20 gift card for ingredients. I felt fine about this as I often use their products anyway!). Dense, rich, and decidedly not low-fat or low-carb, these little morsels fall into the territory of so bad, but so good--and are completely habit-forming. Chocolate Cream Cheese Graham Cracker Bars
- makes about 24 small bars -
Ingredients
1/2 cup unsalted butter
1/4 cup sugar (I used C+H's baker's sugar, which is really quite wonderful--it falls somewhere between confectioners' and granulated sugar in texture)
1 egg, beaten
1 1/4 cups graham cracker crumbs
1/2 cup finely chopped walnuts (pecans would also work nicely I think)
About 1 cup chocolate cream cheese frosting (it was leftover from a batch I made from this recipe)--or the frosting of your choice.
Procedure
Prepare the base. In a saucepan, heat butter and sugar until the sugar is completely absorbed in the liquid. Add beaten egg and stir to thicken. Remove from heat and stir in the graham cracker crumbs and nuts. Press into a greased and parchment-lined 8x8-inch pan. Pat in firmly and evenly. Let this chill for about 2 hours.
Spread the frosting thickly and evenly on top of the graham cracker base. Let chill until it is firm, and if desired, decorate the top with festive christmas icing (I used Wilton's glitter gel in red and green and their opaque writing icing in white).
They say you have to learn the rules before you break them. But is it ever possible to break them just a little bit while you learn them? Case in point: gingerbread men. I haven't made enough of them to feel comfortable messing with the classic recipe but wanted to have a little fun with this batch nonetheless. The solution? Using a classic recipe—in this case, from Betty Crocker's Cooky Book—but decorating them as Gingerbread Mad Men, inspired by the characters in the AMC series. Note: I am pretty much obsessed with Mad Men (I blame my friend Julie). I only discovered it about a month ago and actually am not caught up to the end of Season 3 yet, so please, no spoilers! You can check out the full entry -- plus the recipe I used -- on Serious Eats!