
 Legos! Star Wars! Cookies! These sweet treats are like veritable galactic minefield of awesome. And now, the force of deliciousness can be with you, too--CakeSpy reader Emily (who writes the wonderful blog Sugar & Meringue and also has a fantastic Etsy shop full of vintage cake finds!) has put together a tutorial on how to make your own!
Curious about Emily? Here's what she has to say about herself: I was born and raised in Nebraska. I grew up in a town with a population of about 650. I like to brag that I was the valedictorian of my class. (I just don't tell anyone there were only 18 people in my class!) Yep… I'm from the sticks.
Components needed:
- Lego minifigure cookie cutter
- Several pastry bags
- Several writing tips- ranging in size from about 1 - 4 & couplers
- Gel or paste frosting coloring: Ivory, Black, Peach, Copper, Brown & Royal Blue
- A glass tumbler
- Lots of bowls
- A very small/fine artist liner paint brush - buy a new one and use it only for food
Royal Icing (See recipe below)
- 6 cups powdered sugar
- 2/3 cup water
- 4 1/2 tablespoons meringue powder
Combine all ingredients and beat at medium/high speed until soft peaks form.
Procedure for Lego Cookies
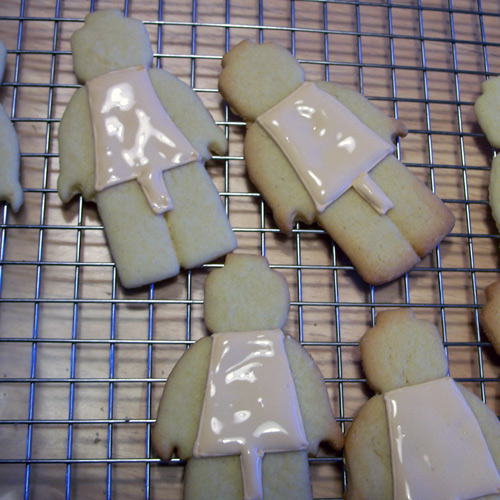
- Make rolled sugar cookies using your favorite recipe. Make Royal Icing (you may need 2 bathces) and divide into 6 bowls. Add coloring to each bowl. You will need: white - shirt & pants ivory - vest brown - belt black - details peach - face copper - hair
- Next, divide each color in half and put in two separate bowls. (One half will be used for piping and the other half will be used for flooding.) Add water, a tiny bit at a time, to one of the halves so that the icing is the consistency of a thick cake batter. (It should be thin enough so that it will drip from a spoon and smooth itself out, but not watery)
- Equip one pastry bag with a #2 or 3 tip. Fill it with the UNTHINNED icing. Equip another bag with a #3 or 4 tip. Put the bag (tip down) in a glass tumbler and cuff the bag over the top of the glass so you can pour in the thinned icing.
- Begin by outlining Obi Wan’s vest with the unthinned icing. Then “flood” inside the outline with the thinned icing. You will follow the same procedure for the following steps.
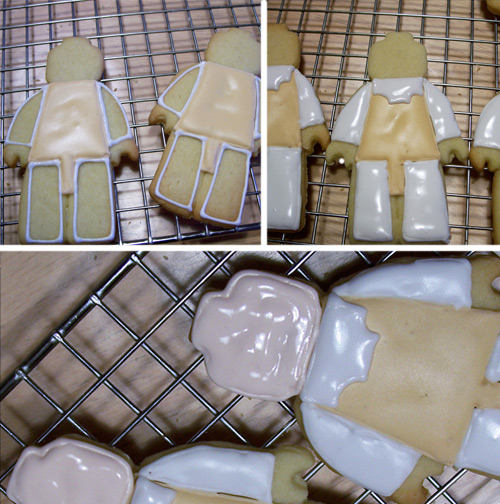
- Now… STOP!!!!Now… STOP!!!! At this point you need to let the icing dry completely before going on to the next step so that the colors don’t bleed. You may want to let them dry overnight.

- Outline and flood belt with brown. Allow to dry. Then use a #1 tip to pipe on the black details and a #2 tip to pipe the eyes.
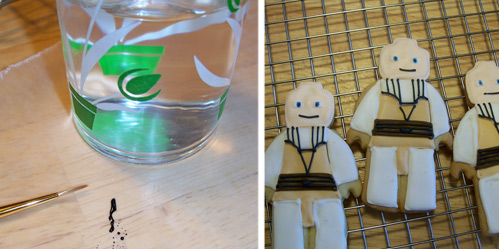
- Dab a tiny bit of royal blue coloring on some waxed paper and then, with your paint brush, paint the eyes.
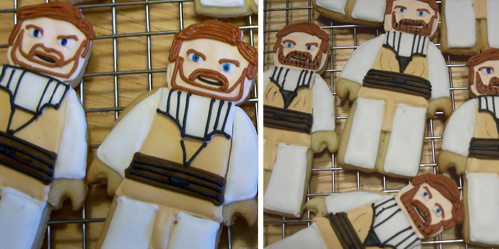
- Pipe on hair and eyebrows. Outline then flood beard and mustache. When beard and mustache are dry, use paint brush to paint on the black lines with black coloring. Use ivory coloring to paint details on shirt/vest.
Want more? Remember, you can find more of Emily's work at Sugar & Meringue, and be sure to check out her Etsy shop!